While this feature is still in beta mode, you can now add interactive questions to YouTube videos that are attached to Classroom assignments. Watch my video to learn more about this great new feature.
While this feature is still in beta mode, you can now add interactive questions to YouTube videos that are attached to Classroom assignments. Watch my video to learn more about this great new feature.
In the past, I have always recommended that you make a copy of your Google Classroom so that you have a clean copy to use with your students for next year. However, what I have begun to see for those of you that have very material and video heavy Google Classrooms is that the new copy you have created is missing materials or seems to get caught in a loop where your videos never process correctly or attachments are gone. I have done some research on this issue and can’t find a really good solution within Google, so I am suggesting that you take the following steps and create what is considered a “Master Classroom.” This master classroom will contain all of your content, in descending (whatever you assigned last will be at the top) order, but will be a repository that you can use to assign (by using the “reuse assignment” option) into a new Classroom. That way, all of your original content is still there, you can see what order you assigned it, but you don’t have that terrible moment where you and your students discover that the content you thought was in your Classroom really isn’t there.
To create your new “Master Classroom”:
Your new master class is going to work as that old fashioned plan book that we used to write every single lesson into! You can now scroll through topics and assignments that you have used in the past and reuse them in your new Google Classroom. The benefit of this is that in your master classroom, all of the assignments, materials and topics are already published because you used them in the past. When you reuse them in your new Classroom, it puts them back into draft form, allows you to edit or add new materials, and assign new due dates to your new students. To reuse a post:
To see how to use the reuse option, watch this short video (no sound).
As you are wrapping up the school year, there are a few housekeeping items that you should attend to when it comes to your Google Classroom.
The best procedure to close out your year is to:
1. Return all student work
2. Make a copy of your Classroom if you would like to reuse it next year
3. Archive your current Classroom
If your Google Classroom is not content heavy and you want to be able to use it again next year with your students, you should make a copy of the Classroom so that all materials go back into draft form so your new students will not be confused by materials that you used with previous students. Simply deleting this year’s students from a Google Classroom and reusing it with new students actually creates more work for you in the long run since all materials are already published, are assigned with due dates, and have student work associated with them. When you create a new copy of your current Google Classroom, you are setting up a clean environment that still has your materials, just in draft form that can be published when you are ready. When you archive your old Google Classroom, your previous students will still find all of their assignments and materials in their Google Drives and will still see an archived version of the course if they dig deep into the Classroom menu, but the Classroom will be view only and students will not be able to change or edit anything in the Classroom itself.
When you make a copy of your Google Classroom, all content on the Classwork section of Classroom is automatically put into draft mode. You will then be able to go in and publish each item as you are ready to use it. Even better is that before you publish it for students, you can edit the assignment or material to update it for the current year. It really is a win-win situation. The only problem with making a copy of a current Class is that only the content on the Classwork page is copied. Materials on the Stream will not copy.
Follow the steps below to wrap up your Google Classroom for the year.

Return all work: You want to return all student work so that Google moves it from your drive to their drive. Otherwise, you will be wading through student work in your Drive until the end of time. The fastest way to return student work is to:

Make a copy: If you want to reuse the same class for next year (see above to understand why it is better to start with a fresh class rather than delete students from the current class) or you want a copy of your class for reference:
If your Class has a lot of content, it can take some time to make a copy. You will receive an email from Classroom once your copy has been made.

Archive the Class: Clean up your Classroom view by archiving your Class. Don’t worry! You still have access to the archived class and can pull content directly from that class into a new class with just a few clicks of a button. To reuse archived content,
Don’t forget that you can always reuse materials from archived Classrooms. Just because they aren’t viewable on your current dashboard doesn’t mean that they are gone forever!
If you have a content heavy Google Classroom, you might discover that making a copy leaves you with missing content and videos. If that is the case, try my suggestion for making a “Master Google Classroom” from this post.
There are many times when students create content in Google Classroom as part of a project or assignment and we want them to be able to share their work with their classmates to allow for discussion and interaction. Once the students submit their work to their teacher, it kind of gets locked down and the only person that can view it is the teacher, who then has to figure out ways to grab the content and make it shareable with the class. There are all sorts of work arounds but it usually requires the teacher to put time and effort into copying and pasting student work into a new format or by using a third party app like Flip for students to record and share their work.
The easiest way to have students share their work with their classmates and have opportunities for their fellow students to comment on the work and give feedback is by using the “Question” tool in Google Classroom.
Essentially, you create a question that simply asks students to share their work. To share their work, students create an “anyone with the link can comment” link from their work and post that link as their answer to the question. Once the link has been posted, other students are able to click on that link, view the work of their classmates and then use the comment feature naturally built into Google products to leave feedback for their classmates. Since the question is assigned to students, teachers will be able to see, at a glance, which students have responded from the grading side of the assignment. Easy peasy, lemon squeezy!
Here is how to create this sharing opportunity:
Open Google Classroom, navigate to the Classwork page, click “Create” and select “Question from the dropdown.

Set the question type as short answer and then give your students directions on how they are to share their work. The easiest way is for them to open the work to be shared and create an “anyone with the link – commenter” link that can be copied and pasted in as a response to the questions. Your district might have this option locked to just your school domain, so the student would pick that option along with “commenter.”


If you want the students to be able to respond to the work directly on the question thread (this gets a little messy and I don’t necessarily recommend it), make sure you have the “Students can respond to each other” option toggled on.

You can also choose to let students edit their answers. I found that to be helpful when students created and posted the wrong type of link and had to go back and share the right one.
When you create the question, you can always include additional materials. You could create a video showing students what you want them to do. You could share your own work for the students to comment on. You could add a funky music video that harkens back to the golden age of MTV. It is totally up to you!
Students will then be able to answer the question by posting their link as a response. What is kind of cool about this is that they will not be given the option to see the responses of their classmates until they have posted their own response.

Once they have posted their link, they will then be given the option to see the responses of their classmates.


Students can now click on the links their classmates shared, open the materials and use the comment feature to leave feedback for their peers.

As the teacher, I can then look at the student answer side of the question to see who has turned their work in and who has not. The links are there for me to click on and I will be able to see who left comments for their peers. It makes it pretty easy to track participation.

Now, I know that you can get all fancy and do this with Flip, but it requires students to go out and use a third party application. The nice thing about using the question feature is that it is all in-house and contained in Google Classroom. And, you can have the students submit just about any product for their peers to view. Videos, docs, drawings, slides, sheets, and images are just a few that come to mind.
I hope this method of student work sharing makes your life a little easier. How do you see yourself using it with your students?
We have been using Google Classroom in our district for a long time now, but I feel like admin are still a little shaky when it comes to their understanding of the functionality of Google Classroom. A few of them jumped on the bandwagon in the early days of adoption and made a classroom for staff communication, but by-and-large, they have kind of abandoned the medium for their own uses. I think it is important that admin have conversations with their teachers about how they are using Google Classroom, so I made these quick guides for admins to use. One is focused on how the “Stream” functions and the other is on the nuts and bolts of the “Classwork” page.


What do you think? Will these drive conversations in the right way? Am I missing something that you think I should add? Let me know in the comments! If you would like a copy of these for yourself, here is the link to the Google Slide I used to create them.

During this pandemic, it has become increasingly clear that caregivers and students need a one-stop shop where they can get information about the happenings of our classrooms. Knowing that caregivers cannot actually take a look into Google Classroom without signing in as a student, many teachers have turned to Google Sites to create informational classroom websites.
A useful feature that you can add to your website is you Google Classroom Calendar (or any Google Calendar that you create to keep caregivers and students informed.) When you add the Google Classroom calendar, students (and caregivers) can easily see when assignments are due. They can also get assignment details by clicking on the assignment while viewing the calendar. As I have mentioned before, I have a son who needs a ton of parental management. Being able to see what is due and when it is due without having to sign in as my kid makes my life a lot easier. I am sure I can’t be the only parent out there who has to be “in charge” of learning at home!
With the quick insert feature available in Sites, you can add a calendar in just a few clicks. However, before you get started on that, you need to make sure that the calendar is visible to viewers outside of your domain. This requires you to go to your Google Calendar and change a view setting.
To see how to add a Google Calendar and make sure your settings are correct, watch this short video.

Students have suddenly had to adapt to a new digital learning environment and it can be overwhelming even for the most organized student. If the student has one teacher and is in one Google Classroom, figuring out what needs to be done does not require much more than a quick check-in on the stream or classwork page. If the student has more than one teacher or is in more than one Google Classroom, figuring out what work needs to be completed can be time-consuming as students navigate to each of their classes and view the stream or classwork page for assignments.
There is a feature in Google Classroom that few people seem to be aware of, but can be an amazing lifesaver for students (and teachers)! It is the To-Do List.
If you are looking at your Google Classroom homepage, click on the three lines to reveal the link for the To-Do List.


Once you click on that To-do heading, all activities that have been assigned will appear in order of due date. If there is no due date attached, the assignment will be at the bottom of the list. As you can see, my student has some serious work to do.

Each class has a sidebar color that matches the heading color of the classroom the work came from, but you can also see which class the assignment is from if you look under the title of the assignment. To access the assignment, simply click on the title of the assignment and it will take the student right to the directions and attachments for said assignment.

Students can also click on the “Done” tab and see all assignments that have been turned in along with any digital grades that have been given.

So, my fabulous teacher friends, let your students know about this amazing feature in Google Classroom. I guarantee that you will be helping at least one of your students get a better handle on how to manage their workload. And teachers, did you know that you also have a to-do list? It helps you know what you need to grade and return to your students. (Remember to return graded work to your students so that it doesn’t live in your Google Drive for the rest of your life!)

I have been getting a lot of questions from teachers about issues they are having with Google Classroom and Screencastify while trying to teach remotely.
The first, and probably most pressing issue teachers seem to be having is that when they create their Screencastify videos, their words don’t match their mouths. Nobody has time to look like they are a star in a poorly dubbed film! The fix for this is hard, arduous, and absolutely necessary. Are you ready for it?
RESTART YOUR DEVICE!!!!
Seriously, when is the last time you actually did something other than close the lid on your Chromebook or laptop? If you can’t even remember when, then you must shut down and restart right now (or after you finish reading this). Your device is managing a billion processes that you started and just left running. Doing a hard shut down and restart will help immensely.
The other way to fix this issue is to close the gabillion tabs you have open before you start recording. If your device is trying to manage a gabillion things at one time, your video is not going to get priority attention.
The second issue people are having is that they will create Google Classroom assignments with the “make a copy for each student” option, but the attachments don’t appear for all students. This is a known glitch in Classroom. Alice Keeler wrote a blog post about it. She says that eventually, the attachment will appear for the students. I have also heard that if you send the student a private message on that particular assignment, it will force the attachment to appear. What seems to work best is if students follow these steps:
1) Click the classwork tab at the top
2) Click on the assignment title to expand the assignment
3) Click on “View Assignment”
4) Locate “Your Work” in the top right corner and click on the file with your name on it.
Just remember, you are awesome and amazing and you are doing your best for your students as you try to learn this whole new way of teaching! Don’t be too hard on yourself. You’ve got this!

Now that many of our schools have closed and we have converted to distance learning, you might be wondering how you or your students can access Google Classroom; especially in one computer households or for students without devices. Well, accessing Classroom is easier than you think!
I feel like the easiest way to access Google Classroom without a computer is by using the Classroom App on a phone or a tablet. Click here for the app on the App Store and here for Google Play Once the app has been downloaded to a phone or tablet, students login with their school district accounts and will find an interface that feels very similar to the one they find at school.
They can click on any assignment, interact with the content, watch any videos you post (did you know that you can record videos directly into Classroom by using the camera on your phone while you are using the app?), and even create Slides and Docs right on their phones! I have known quite a few students that claim they can type an entire paper on their phone. Now is their time to shine! Teachers can even grade assignments and give feedback directly to students with the app. It is really a great tool to have at your fingertips.
Classroom can be opened on Xbox and Playstation. There isn’t an app that the students can add to their consoles. Instead, they are going to have to use the built-in browsers that come on the two devices. On Xbox, it is Microsoft Edge. On Playstation, it is the “www” browser. Your students will probably know how to find the browsers on their consoles, but if not, each one has a search function they can access on the home screen.
Once the browser has been opened:
If students have a keyboard they can plug in, they will have a much easier time of navigation. Otherwise, they will have to use their controllers to click on the classroom tiles, open up assignments and type. I did a trial run on both consoles and was able to open assignments and interact with video and written instructions. I was also able to open attachments like Docs and Slides and type on them. It wasn’t easy with a controller, but at least I could access the content. I will say, I have watched my son type faster with his controller than some kids can on a keyboard, so maybe I am worried about this for nothing!
As we all struggle with ways to meet the needs of our learners, I just thought it would be valuable to know that there are multiple options for students as they access your content.
Google Classroom has released a new feature called “Originality Reports.” This feature is designed to help your students avoid ‘accidental plagiarism” from all that copying and pasting from the internet that they do.
Here is the official description of the feature from Google: Originality reports is a new feature that brings the capabilities of Google search right to your student assignments and grading interface through Google Classroom. The learning tool helps both teachers and students thoroughly review and analyze coursework to make sure it is properly cited and avoid unintentional plagiarism. This feature was designed to help students improve their writing and spot potential issues while saving you time while grading.
You and your students can check work for unoriginal content with Originality reports. This tool uses Google Search to compare a student’s Google Docs against billions of webpages and millions of books. Originality reports then displays links to the detected webpages and flags uncited text. The reports can:
Help students identify unintentional plagiarism and uncited content before submitting assignments.
Help teachers see where students used source material and if they properly documented their sources.
When you turn on Originality reports for an assignment, students can run 3 reports per assignment before submitting their work. You can’t see the reports students run. After students run their last report, they can continue to improve their work before submitting the assignment.
This feature is actually pretty slick and easy to use. When you create an assignment in Classroom, you have the option of turning on the originality reports by simply clicking the button on the right of the assignment dialog.

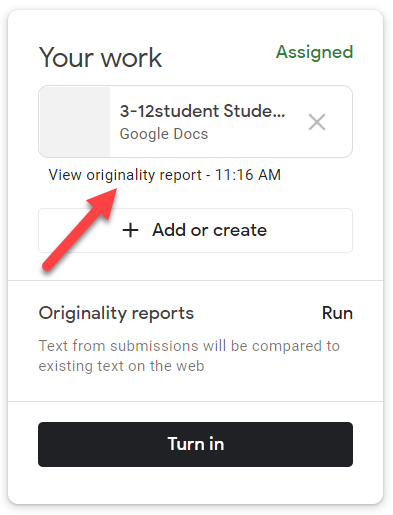
Once you have built your assignment and clicked that button, the students will interact with the assignment the way they usually do. They can create content right in Classroom or they can add an already created document to the assignment. When their content is attached to the assignment, they then have the ability to run an originality report on their work up to 3 times before they turn it in.

The idea behind this feature is to teach the students how to write and cite and create original content. When the students run the originality report, Classroom basically runs a Google search and brings back any content matches that are found on the web. Students can then address these findings and rewrite for originality or create better citations for the content they have included.
Here I have a student writing a paper about the industrial revolution. In true lazy student fashion, I simply created a Doc in the assignment, did a quick web search and copies content to my doc.


Once I was done copying and pasting the content, I looked back at the assignment view in Classroom and clicked the “Run” button on the far right of the student assignment view.  Classroom ran the originality report and then provided me with a link I could click on to see what was found. My teacher cannot yet see this report; it is private only to me at this point.
As you can see by the giant yellow highlight, Google caught that I had copied and pasted the entire text from a web source. Not only did it flag that all of my content was copied and pasted, it also gave me (as a student) the top web match for where I got the content. If I (as a student) can see that match, you better believe that my teacher can as well if I submit this document as is!

Because I understand the mind of a teenager better than I would ever want to, I then decided to “edit” this paper a little by taking out some key words, changing a few sentences around while trying to “make it my own.” After I made these changes, I then ran the second of three available originality reports. But, alas, Google once again caught my lazy work habits. But, since I am a teen, I went ahead and submitted this assignment anyway! I am sure my teacher won’t notice.

When I change roles and look at student work, you will see that, as the teacher, I do not have to do anything to run my own originality report. Classroom automatically runs an originality report for each submitted Docs file, visible only to you. If a student unsubmits and resubmits an assignment, Classroom runs another originality report for the instructor. These reports don’t appear on this view. You need to open the student work to be able to view the originality report.


When I open each individual assignment, I can see that content has been flagged.

I can now have meaningful conversations with this student about their work and this also lets me know that I have more work to do when it comes to teaching proper research techniques.
Originality reports are viewable for 45 days. After that, you can run another report by opening the student’s submission from within the Classroom grading tool.
When you share this tool with students for the first time, Google suggests that you preview it or share this post in Classroom before you begin.
This feature is not going to automatically check all student assignments. You simply need to enable it when you need it. Originality reports are still in beta, so check and see if your district administrator has asked to pilot this feature in your district.
