Posted in Cool Tools, Creating Accessibility, Student Creation

Student Created Read-Aloud Videos of Awesomeness

Recently, I read the article “Best Read Alouds on YouTube” from the website We are TeachersThis article is full of great YouTube channels where favorite picture books are read aloud by a variety of personalities.

The read-aloud portion of my day was always one of my favorites. Whether as a classroom teacher or as a media specialist, I relished the opportunity to share my reader’s voice with my students. I tried to bring the story alive and I felt an inner sense of pride when the kids would listen to the story with rapt attention. But there is always a moment in my teaching life that has stood out. One year, I was teaching language arts to a really rowdy group of 8th graders, most of whom were reading significantly below grade level. We were doing a unit on poetry, slugging through the classics, when a student asked if he could read his favorite poem aloud to the class. I was so excited that he had a favorite poem that I immediately agreed and listened in awe as he presented us with an amazing version of My Beard by Shel Silverstein.

This performance kicked off a really cool string of days where the kids searched out their favorite poems, practiced reading them aloud and then performed them for the rest of the class. Student engagement was high, but most of all, students were practicing their fluency and really digging into text so that they were able to read their favorites with voices that would entrance and capture the attention of their classmates.

I am thinking that it is time for students to share their read-aloud voices with us. Instead of listening to an adult voice, it is their turn to bring stories to life. I know that we don’t have the time in our day to have 25-30 kids read their favorite stories or passages to the class, but we can use our technology to give them the chance to record their favorite stories for their classmates. (Or their parents, or their siblings, or just you, or really, just themselves)

Students can select their favorite picture book or passage from a book and practice their fluency until they have all of the confidence of a kindergarten teacher singing the ABC song. Of course, students might need to see a few examples of awesome read-alouds, which is where you, oh amazing teacher come in. If reading aloud isn’t your thing, click on the article above and fill the brains of your students with excellent examples from one of the YouTube channels listed in the article. Once they feel like the read-aloud rockstar they are, choose one of the platforms listed below and let them get on with their bad selves. Imagine the listening library that your students will create for one another. Imagine the fluency practice they will be getting! And don’t think that this idea is just for little kids. Big kids like to read aloud too. They can choose picture books or pieces of their favorite novels. Just get them reading and sharing their voice with their peers!

Flipgrid: Create an entire grid dedicated to read-alouds. Students can choose to sit in front of their devices and show the pages of their book as they read aloud, or you can rig up a stand where the camera points at the book only and the student narrates from behind the screen. Shockingly enough, some of our students are a little camera shy. Students can then visit the read-alouds of their classmates, leave feedback, or suggest new titles for their friends to read. I bet you will find there is a lot of natural voice-over talent in your classrooms.

Seesaw: Students can add their read-alouds to their journal and their stories can be shared with families and other students in the classroom. Just like with Flipgrid, students can either hold their books in front of the camera or can hide behind the camera as they turn pages and bring their stories to life.

Padlet: Padlet has a nifty tool that allows you to record a video directly into a Padlet post. You can create a shared Padlet and student can record right on the Padlet for their classmates to see. The only drawback to the Padlet is that videos can only be five minutes long. This might be a great option for those shorter, favorite passages from older readers.

Screencastify: Using the free Screencastify chrome extension, students can record their read-aloud using their Chromebook camera and microphone. Once their video is recorded, students can then put their videos into a Google Slide presentation or upload directly to a class YouTube channel. If it were me, I would create shared Slides presentations that were themed by genre. Then I would put the links to the Slides presentation in Google Classroom, students could create their videos and add them to the correct presentation. My favorite part about this is that you will have have a library of read-alouds that you can use with future classes.

I would love to hear your ideas about how you would get your students creating their own read-aloud. What tools would you use? How would you get them to interact with your new library? How will you motivate them to join in?

Posted in Cool Tools, Creating Accessibility, EquatIO, extensions, Google Classroom, Google Workspace for Education

Math in GSuite with EquatIO and EquatIO mathspace

Math and GSuite have not always gone hand-in-hand. If you wanted to create math-rich Docs or Slides, you were pretty limited in formatting options, and many teachers wound up relying on screenshots and snipping tools to create materials for students. But, rejoice, for now there is EquatIO! The EquatIO extension allows you to add real math language to Google Docs, Slides and Forms. Equations, graphs, formulas, etc are all easy to create and use with your students.

Once you install the extension, you will have a new toolbar available in your GSuite products. With this toolbar, you can create expressions, formulas; all that crazy math stuff that I really don’t understand. 

equatio toolbar
EquatIO Toolbar – Available in Docs, Slides and Forms

Not only does EquatIO offer an easy to use equation editor that allows the teacher to either type or dictate mathematical sentences, it also has a nifty prediction tool that helps you add the correct math symbols in your work.

If you are more of a talker than a typer, try the voice input option. When you speak your problem, EquatIO will create the sentence for you. If you want to allow students to talk through their problem solving, they can continue dictating their thinking and add additional lines to their math as they work towards the solution.

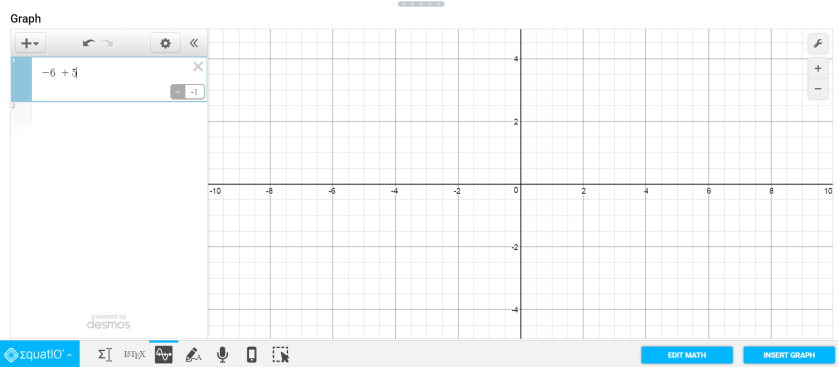
EquatIO has paired with Desmos to offer an easy to use graphing tool.

Desmos Graph

Another bell and whistle EquatIO offers is the ability to handwrite your math. If you are one of the lucky ones and have access to a tablet or touchscreen, you can handwrite all of your amazing math problems. 

Handwriting

Sometimes we find the material we want to share with our students online. EquatIO offers a screenreader that not only grabs math from other digital locations and transfers it to your document, it also reads it to you! Here it is in action:

Since the free student EquatIO accounts are limited to Google Docs, I can create all of this math in a doc and then assign it via Google Classroom with the “Make a Copy” option. My students will then be able to use the same tools as they solve my problems. Well, not my personal problems, just my math problems.

EquatIO’s mathspace

Sometimes our math involves more than just numbers and letters and this is where EquatIO’s mathspace comes in. Instead of just adding equations and formulas to a Google Doc or Slide, EquatIO’s mathspace gives you a blank canvas where you can create the math (or chemistry or physics) problems of your dreams! 

When you go to equat.io, you will first land on your EquatIO dashboard. Once here, you can create a new mathspace or you can edit/work with an existing one.

shows squares with math work in them and a plus sign to make a new math canvas

The mathspace canvas is amazing! In addition to the equation editor, you have a freehand draw tool and access to a variety of shapes, symbols and clip art.

graph paper with a drawing canvas and shape tools
Different shapes and symbols available in the mathspace canvas.

This space now becomes an interactive math problem.

Advanced Problems

The teacher can create on the canvas and then share a link to the problem in Google Classroom with the “Make a Copy” option. As a user of a free account, your students will not be able to respond directly on the canvas you have shared, but they can open their own mathspace, construct their response and then turn in their work by adding a link in Classroom.

I am not a math or science teacher, but these tools really excite me. The EquatIO extension and Equat.io mathspace create endless possibilities! To get your free educator account for EquatIO, click here!


Posted in Google Classroom, Google Drawings, Google Slides, Google Workspace for Education

Create Sorting Activities with Google Drawings or Slides

Having students sort materials to show their mastery of a concept is not new to education. As a heavy user of Words Their Way, I used word sorts in my classroom each week. I am being honest when I say I came to loathe the day we started our new sorts. My main pain points were having the students use class time to cut their sorts out and the number of words that would go missing from each sort when a piece of paper fluttered to the ground or when a student lost the entire bag or envelope that contained their sort. Sort activities were not my favorite! I finally had the brilliant idea to use GSuite tools to attack these sorting activities and make them more manageable for students (and me, of course!) By digitizing sorts and assigning them through Google Classroom, I cut out the biggest pain points and made life easier for everybody.

Using a Google tool to create a digital sort is a lot easier than you might think. The two tools that work best for this type of activity are Drawings or Slides. Drawings will function more like a one-and-done type of sort whereas Slides will allow you to create multiple activities housed within the same Slide presentation.

The idea is simple. Use the white space (or canvas) in the middle of your screen to create sort topics and use the gray space around the slide or drawing to place items for sorting. These items can be text boxes or images.

Here are some examples of sorts that I have created:

This slideshow requires JavaScript.

To create the sorts, follow these simple directions: (I like to create within a folder in my Drive so that I always know where my items are)

  1. Go to your Google Drive and navigate to the folder where you want your sort to be housed.
  2. Click New, mouse over More and select Google Drawings (or Slides)
  3. Give it a name!
  4. Click “Insert” and select “Table” from the drop-down.
  5. Create a table by mousing over the squares until you have the columns you want for your sort.
  6. Click and drag the corners of the table until it covers the entire white space in my Drawing.
  7. Using the traditional formatting tools, I can then add titles to each box of my sort.
  8. Click on the text box icon in the menu and draw a text box in the gray space
  9. Change your font style and size to what you want and type in your first word.
  10. Copy the text box (ctrl c on the keyboard) and then paste it (ctrl v) the number of times equal to the number of text boxes that you need.
  11. Separate out the text boxes you have created by dragging them around into the gray space around your drawing.
  12. Change the text to the words you need for your sort.
  13. When you are finished, assign the sort through Google Classroom with the “Make a Copy” for each student option.

If you are more of a visual learner, here is a video that shows how this is done.

This particular sort that I created is a word sort, but you could easily make it a concept sort by putting images instead of text boxes in the gray space around your drawing. You can also create this same activity with Slides, you just have a little less gray space to work with. The nice thing about creating with Slides is that you can have multiple sorts all housed within the same file.

Here are some helpful tips:

  • Insert a table for your background if you are using columns. That way, kids won’t accidentally click and drag individual lines out of the way. They can always use ctrl z if they accidentally move the entire table.
  • If you have a more complicated background that is not just going to be using columns, create the background using Drawings. Then, publish it to the web and then insert it as a picture. Here is a video.  
  • Create one template and then duplicate it/copy it/reuse it often
  • Copy and paste will be your best friend.

Happy sorting!

Posted in Cool Tools, Student Creation

Take The Boring Out Of Flashcards With Pear Deck’s Flashcard Factory

Flashcards are a tried and true educational tool that have a place in just about every classroom. From vocabulary words to math theorems to important places, flashcards have been used by students in just about every grade level.

Sometimes, students get together to drill each other on flashcards, but for the most part, the creation of flashcards is a very solitary experience. But now we can make the creation of flashcards a more collaborative activity for students by using Pear Deck’s Flashcard Factory.

two rectangles - the one on the left is for Pear Deck. The one on the right is for Pear Deck Vocabulary
Login to http://www.peardeck.com and select “Flashcard Factory.”

Using Flashcard Factory is a simple as 1, 2, 3:

One: Create your study set/vocabulary list in Flashcard Factory

Flashcard with the word "Cellular" and a highlighted definition from the dictionary
Write your own definitions or select a definition from Merriam Webster

TWO: Initiate the live activity with your students by clicking on the red “Play Flashcard Factory” button. Students will be paired up and separated into two groups; day shift and night shift. If you are unhappy with the groupings, you can use the shuffle button to remix the students. Once students have gone to sit with their partners, you can launch the factory and student pairs will draw images and write sentences that define the terms.

THREE: As a class, students and teachers review the created flashcards. If the flashcard is an awesome example of the definition of the term, it gets voted in. If the flashcard is weak and doesn’t pass muster, it gets left on the factory floor. Students are encouraged to discuss and debate each flashcard, building an even greater knowledge and understanding of the word.

When you have created a study set using student materials, you can then “ship” your new flashcards right to Quizlet. Quizlet then lets you share the completed study set with your students via Google Classroom so that they can study or play games with the sets when they are ready.

This slideshow requires JavaScript.

To use this new and awesome tool, go to www.peardeck.com and join up/sign in and click on “Start a Vocab List.” Happy flashcarding!