One of the ways we have been able to support students with little effort on our part is by teaching them how to use Immersive Reader, an app that students could use to have online content read to them. It had some kinks to it, especially with how it didn’t work well with Google stuff, but it was our only option.
However, it no longer works with Google Chrome and so we have had to pivot. And this pivot has actually turned out to be wonderful and much more useful for students.
On their Chromebooks, students have accessibility tools that open up learning opportunities for all students regardless of their reading or writing abilities. Their Chromebook has a speech to text feature that will read ANYTHING on their screen to them. They also have access to a dictation tool that will allow them to voice type anywhere there is a text field, even on Google Slides and Google Forms!
Chromebook Accessibility Tools in Action
These tools are crucial for the success of some of our students so I am counting on you to get the word out. I have created materials for you to share with the students. These materials are set so that you can place them in Google Classroom or show them to your students in class. This is especially important for our junior high and high school students that are desperately trying to hide their need for accommodations.
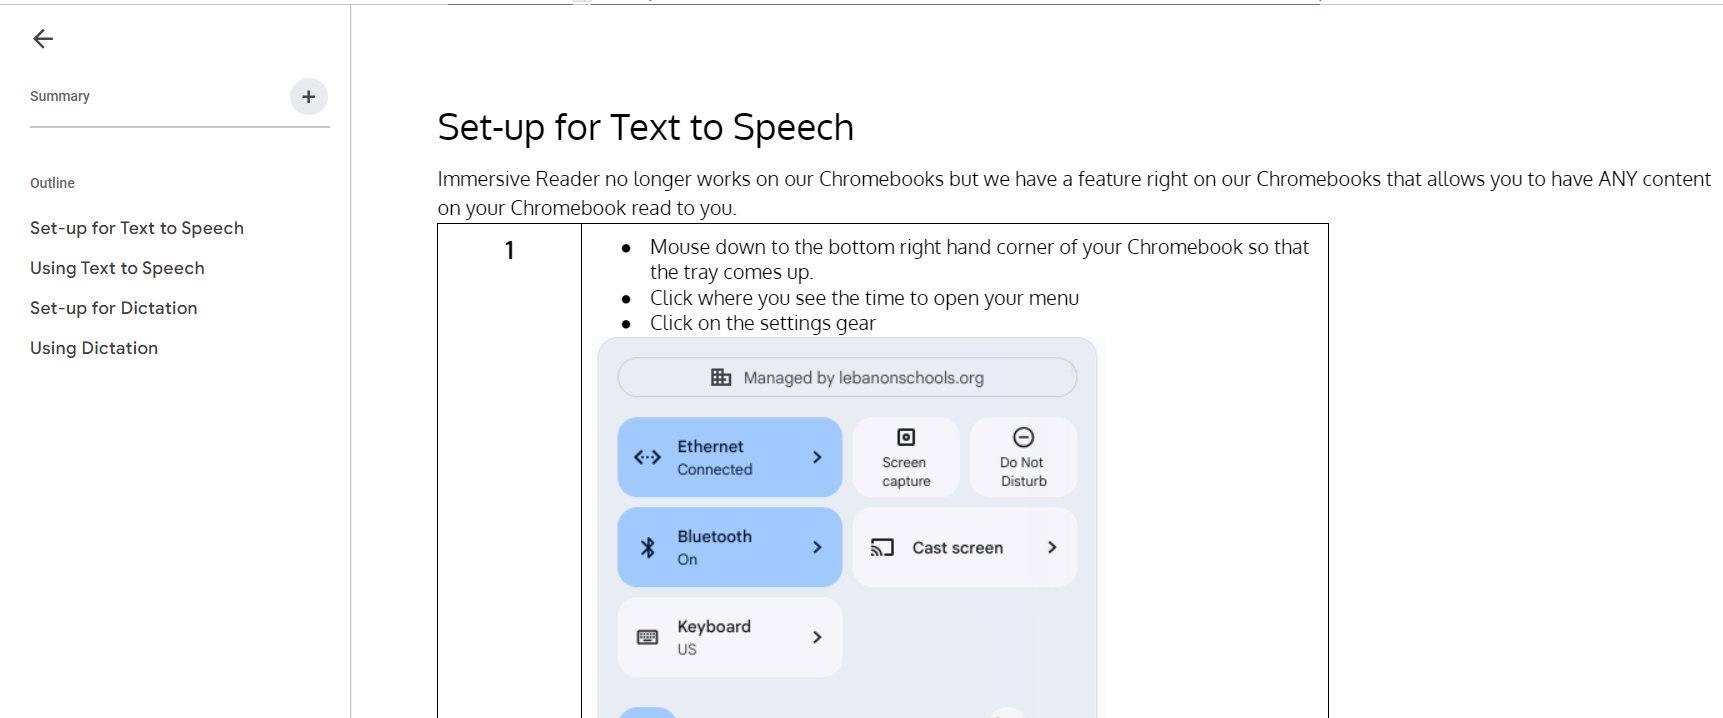
Show students how to set up and use the Text to Speech Feature
Show students how to set up and use the dictation tool
Step-by-step Written Guide with Visuals for both Features (Expand the document outline on the left to access the table of contents)
Are you a to-do list maker? Do you scribble down all of the things you need to do on whatever random piece of paper you find on your desk? Are you always searching for just the right way to keep track of your tasks? Have you ever had an “oh, &*@$!” moment because you forgot to do something that really needed to be done? Or, are you looking for a way to get your students to embrace organizational techniques that will help them get their work done?
If any of these describe you, then do I have the solution you have been looking for! Google recently updated their TASK feature (embedded in Google Calendar) and made it an amazingly easy tool to use. It is now more robust, accessible in multiple ways, convenient and can help you make sure that you are in control of your tasks. In fact, it will make you the MASTER OF TASKS!
To learn how to be a master of tasks, check out this tutorial I created for the teachers in my district. Once you have mastered your tasks, make sure you teach your students to do the same!
There are many times when students create content in Google Classroom as part of a project or assignment and we want them to be able to share their work with their classmates to allow for discussion and interaction. Once the students submit their work to their teacher, it kind of gets locked down and the only person that can view it is the teacher, who then has to figure out ways to grab the content and make it shareable with the class. There are all sorts of work arounds but it usually requires the teacher to put time and effort into copying and pasting student work into a new format or by using a third party app like Flip for students to record and share their work.
The easiest way to have students share their work with their classmates and have opportunities for their fellow students to comment on the work and give feedback is by using the “Question” tool in Google Classroom.
Essentially, you create a question that simply asks students to share their work. To share their work, students create an “anyone with the link can comment” link from their work and post that link as their answer to the question. Once the link has been posted, other students are able to click on that link, view the work of their classmates and then use the comment feature naturally built into Google products to leave feedback for their classmates. Since the question is assigned to students, teachers will be able to see, at a glance, which students have responded from the grading side of the assignment. Easy peasy, lemon squeezy!
Here is how to create this sharing opportunity:
Open Google Classroom, navigate to the Classwork page, click “Create” and select “Question from the dropdown.
Set the question type as short answer and then give your students directions on how they are to share their work. The easiest way is for them to open the work to be shared and create an “anyone with the link – commenter” link that can be copied and pasted in as a response to the questions. Your district might have this option locked to just your school domain, so the student would pick that option along with “commenter.”
Student View When Creating the LinkSample Way to Write the Directions
If you want the students to be able to respond to the work directly on the question thread (this gets a little messy and I don’t necessarily recommend it), make sure you have the “Students can respond to each other” option toggled on.
Allowing students to reply to each other creates a really long thread to wade through.
You can also choose to let students edit their answers. I found that to be helpful when students created and posted the wrong type of link and had to go back and share the right one.
When you create the question, you can always include additional materials. You could create a video showing students what you want them to do. You could share your own work for the students to comment on. You could add a funky music video that harkens back to the golden age of MTV. It is totally up to you!
Students will then be able to answer the question by posting their link as a response. What is kind of cool about this is that they will not be given the option to see the responses of their classmates until they have posted their own response.
Student View in Google Classroom
Once they have posted their link, they will then be given the option to see the responses of their classmates.
After the link is added, they now have the option to see classmates answersThe links show up next to the names of the classmates
Students can now click on the links their classmates shared, open the materials and use the comment feature to leave feedback for their peers.
Students can leave feedback for their peers right on their work.
As the teacher, I can then look at the student answer side of the question to see who has turned their work in and who has not. The links are there for me to click on and I will be able to see who left comments for their peers. It makes it pretty easy to track participation.
Teacher view of the question once it has been posted
Now, I know that you can get all fancy and do this with Flip, but it requires students to go out and use a third party application. The nice thing about using the question feature is that it is all in-house and contained in Google Classroom. And, you can have the students submit just about any product for their peers to view. Videos, docs, drawings, slides, sheets, and images are just a few that come to mind.
I hope this method of student work sharing makes your life a little easier. How do you see yourself using it with your students?
Students have suddenly had to adapt to a new digital learning environment and it can be overwhelming even for the most organized student. If the student has one teacher and is in one Google Classroom, figuring out what needs to be done does not require much more than a quick check-in on the stream or classwork page. If the student has more than one teacher or is in more than one Google Classroom, figuring out what work needs to be completed can be time-consuming as students navigate to each of their classes and view the stream or classwork page for assignments.
There is a feature in Google Classroom that few people seem to be aware of, but can be an amazing lifesaver for students (and teachers)! It is the To-Do List.
If you are looking at your Google Classroom homepage, click on the three lines to reveal the link for the To-Do List.
Once you click on that To-do heading, all activities that have been assigned will appear in order of due date. If there is no due date attached, the assignment will be at the bottom of the list. As you can see, my student has some serious work to do.
Each class has a sidebar color that matches the heading color of the classroom the work came from, but you can also see which class the assignment is from if you look under the title of the assignment. To access the assignment, simply click on the title of the assignment and it will take the student right to the directions and attachments for said assignment.
Students can also click on the “Done” tab and see all assignments that have been turned in along with any digital grades that have been given.
So, my fabulous teacher friends, let your students know about this amazing feature in Google Classroom. I guarantee that you will be helping at least one of your students get a better handle on how to manage their workload. And teachers, did you know that you also have a to-do list? It helps you know what you need to grade and return to your students. (Remember to return graded work to your students so that it doesn’t live in yourGoogle Drive for the rest of your life!)