Screencastify has become a big part of my life during this year of the pandemic. I don’t know how I could have made it this far without it.
If you have been making videos but have not yet learned about the zoom tool in the editor, here is your chance to learn how to make the most awesome videos ever!
Usually, when you create a screencast, your entire screen is captured and students or other viewers might not be entirely certain where to look or may not be able to clearly see what you are trying to show or model. The zoom tool lets you physically zoom your camera into a specific part of a video you have already recorded and make that part larger and easier for your viewers to see. You can keep this zoomed in section for as long as you need, and then you can zoom out and then zoom into another section of your screen if you so desire. I frequently use the zoom tool in my videos so that my audience can read any text I am sharing or see where they need to click. The editing process to use it is pretty quick and painless. Not sure what I mean by zooming in? Take a look at this example video from Screencastify.
Now that you know what the zoom tool is, watch this short video to learn how to use it!
I hope this tool makes your videos as awesome as mine!
Students have suddenly had to adapt to a new digital learning environment and it can be overwhelming even for the most organized student. If the student has one teacher and is in one Google Classroom, figuring out what needs to be done does not require much more than a quick check-in on the stream or classwork page. If the student has more than one teacher or is in more than one Google Classroom, figuring out what work needs to be completed can be time-consuming as students navigate to each of their classes and view the stream or classwork page for assignments.
There is a feature in Google Classroom that few people seem to be aware of, but can be an amazing lifesaver for students (and teachers)! It is the To-Do List.
If you are looking at your Google Classroom homepage, click on the three lines to reveal the link for the To-Do List.
Once you click on that To-do heading, all activities that have been assigned will appear in order of due date. If there is no due date attached, the assignment will be at the bottom of the list. As you can see, my student has some serious work to do.
Each class has a sidebar color that matches the heading color of the classroom the work came from, but you can also see which class the assignment is from if you look under the title of the assignment. To access the assignment, simply click on the title of the assignment and it will take the student right to the directions and attachments for said assignment.
Students can also click on the “Done” tab and see all assignments that have been turned in along with any digital grades that have been given.
So, my fabulous teacher friends, let your students know about this amazing feature in Google Classroom. I guarantee that you will be helping at least one of your students get a better handle on how to manage their workload. And teachers, did you know that you also have a to-do list? It helps you know what you need to grade and return to your students. (Remember to return graded work to your students so that it doesn’t live in yourGoogle Drive for the rest of your life!)
Now that many of our schools have closed and we have converted to distance learning, you might be wondering how you or your students can access Google Classroom; especially in one computer households or for students without devices. Well, accessing Classroom is easier than you think!
Google Classroom App
I feel like the easiest way to access Google Classroom without a computer is by using the Classroom App on a phone or a tablet. Click here for the app on the App Store and here for Google Play Once the app has been downloaded to a phone or tablet, students login with their school district accounts and will find an interface that feels very similar to the one they find at school.
This slideshow requires JavaScript.
They can click on any assignment, interact with the content, watch any videos you post (did you know that you can record videos directly into Classroom by using the camera on your phone while you are using the app?), and even create Slides and Docs right on their phones! I have known quite a few students that claim they can type an entire paper on their phone. Now is their time to shine! Teachers can even grade assignments and give feedback directly to students with the app. It is really a great tool to have at your fingertips.
Xbox and Playstation
Classroom can be opened on Xbox and Playstation. There isn’t an app that the students can add to their consoles. Instead, they are going to have to use the built-in browsers that come on the two devices. On Xbox, it is Microsoft Edge. On Playstation, it is the “www” browser. Your students will probably know how to find the browsers on their consoles, but if not, each one has a search function they can access on the home screen.
Once the browser has been opened:
Type in classroom.google.com in the URL bar.
A prompt for a Google account will appear.
Type in your school district email and password – it doesn’t end in google.com and that is ok!
The Classroom home screen will open up.
If students have a keyboard they can plug in, they will have a much easier time of navigation. Otherwise, they will have to use their controllers to click on the classroom tiles, open up assignments and type. I did a trial run on both consoles and was able to open assignments and interact with video and written instructions. I was also able to open attachments like Docs and Slides and type on them. It wasn’t easy with a controller, but at least I could access the content. I will say, I have watched my son type faster with his controller than some kids can on a keyboard, so maybe I am worried about this for nothing!
As we all struggle with ways to meet the needs of our learners, I just thought it would be valuable to know that there are multiple options for students as they access your content.
The ability to add audio to slides has been on my want list since I started using slides years ago. Those of us who were PowerPoint users fondly remember the day when we could add a lovely melody to play over our entire presentation, but we were sadly shut out of this feature when we made the jump to slides.
Well, be sad no more for the ability to insert audio to Google Slides is here! (Or will be here for all users by the end of November if the rumor holds true) This feature is not just for playing sappy music over a photo show of your students at the end of the year; this feature is perfect for so many different teaching and learning activities!
But first, let’s look at how to use the feature. It is relatively simple.
First, you must have the audio file (it should be an MP3 file) in your Google Drive. You can easily use the New < File Upload feature to upload any audio files you might have on your computer. Need to make your own audio files? Check out my blog post about using Screencastify to create your own MP3.
Open your Google Slide presentation. (Remember, if you are starting from scratch, you can type slides.new into your URL bar to quickly create a brand new presentation).
Click Insert and select Audio from the dropdown list.
Once you have inserted the audio, you can choose how your audio will play
You can change the audio icon to an image of your choice if you so choose. Simply click on the audio icon and click “Replace image” from the toolbar. You can either pull an image from your Drive, computer or photos or you can search the web. (Excuse the yucky food images in my gif. I am in the process of lodging a complaint about my bean burrito with a certain fast food chain. 😉)
That’s it! That is all you need to do to add audio to Google Slides. Check in for my next blog post about ideas for using this new feature in your classroom. I mean, beyond that end of the year cry fest when your students fly away and leave you with nothing but the memories.
Two years ago I began this website with a blog post about my angelic son and his inability to keep track of assignments, materials, and generally, anything school related. I am dismayed to say that in the time that has passed, not a single thing has changed for him. Some of this is directly related to his 14-year-old self, but more of it is related to the fact that his teachers still do not allow their students to use their devices in any way that isn’t teacher directed. And since they aren’t directing him to use his calendar, he isn’t.
See, we are an extremely calendar driven family. With two kids that are in multiple sports, guitar lessons and a husband that travels extensively for work, we use our calendars to keep our lives in check and make sure we never miss anything. While my son uses his calendar on his phone to keep track of outside of school stuff, he doesn’t use his calendar to keep track of school assignments because his teachers don’t let him pull his phone out in class and they are not yet a 1:1 school were students have regular access to devices. If he were able to access his phone at school, he could easily add assignments to his calendar as the teachers assigned them. He could even take a picture of any of the documents related to the assignment and then immediately attach them to the calendar event, ensuring that he never really loses an important paper. But, alas, this is not allowed.
The district that I work in is slowly going 1:1 and we are at the point where our entire student body from grades 3-10 have their own Chromebooks to use each day. Many of our teachers are using Google Classroom. Some teachers even let their students have their phones out during the day.
But, very few of them are showing their students how powerful their Google Calendars can be. Why are we ignoring this tool? Why not expose our students to as many ways to get themselves organized as possible? Learning how to be organized now will only pay off in spades in the future!
Did you know that as soon as you add an assignment to Google Classroom with a due date that it shows up on a student’s calendar? Did you know that not only does the name of the assignment show up, but the directions and a direct link back to the assignment in Classroom appears as well?
Did you know that students can add their own events to their Google calendars? If their teacher isn’t using Classroom but still giving them assignments, the students can add it themselves. They even have the ability to include content from their Drive and customize reminder notifications. Just imagine; Students can create an event related to the due date of the assignment, set notification reminders that range from a few minutes to a few days before it is due, and they can include a direct link to their work! No more hunting for their work or trying to remember when things are due.
I would also encourage students to include their own events, like sports practice, extracurricular activities, or time with friends or family on their calendar. Since they can download the calendar app, their responsibilities can follow them everywhere!!! (They might not think this is a good thing, but I sure do!)
We don’t need to force all of our students to use their calendars, but showing them the power of a tool they have at their fingertips is essential. If they don’t know what they have access to, they are missing on gaining critical life skills they will need as they try to adult later in life. Give them all the tools they need to be successful and let them select the one that works best for them!
The high school where I work for is in the process of going 1:1 and while some of the teachers are very excited about the change, some of them are trepidatious and are worried about the technology taking over their classrooms. My mantra is always, “It isn’t about the tech, it is about the teaching and learning.” I also want them to understand that just because we have the tech, it doesn’t mean that students need to be on their devices all day. Here are the suggestions I am sharing with them about small changes that will elicit the biggest impact.
If you would like your own copy of this document, click here!
Recently, I read the article “Best Read Alouds on YouTube” from the website We are Teachers. This article is full of great YouTube channels where favorite picture books are read aloud by a variety of personalities.
The read-aloud portion of my day was always one of my favorites. Whether as a classroom teacher or as a media specialist, I relished the opportunity to share my reader’s voice with my students. I tried to bring the story alive and I felt an inner sense of pride when the kids would listen to the story with rapt attention. But there is always a moment in my teaching life that has stood out. One year, I was teaching language arts to a really rowdy group of 8th graders, most of whom were reading significantly below grade level. We were doing a unit on poetry, slugging through the classics, when a student asked if he could read his favorite poem aloud to the class. I was so excited that he had a favorite poem that I immediately agreed and listened in awe as he presented us with an amazing version of My Beard by Shel Silverstein.
This performance kicked off a really cool string of days where the kids searched out their favorite poems, practiced reading them aloud and then performed them for the rest of the class. Student engagement was high, but most of all, students were practicing their fluency and really digging into text so that they were able to read their favorites with voices that would entrance and capture the attention of their classmates.
I am thinking that it is time for students to share their read-aloud voices with us. Instead of listening to an adult voice, it is their turn to bring stories to life. I know that we don’t have the time in our day to have 25-30 kids read their favorite stories or passages to the class, but we can use our technology to give them the chance to record their favorite stories for their classmates. (Or their parents, or their siblings, or just you, or really, just themselves)
Students can select their favorite picture book or passage from a book and practice their fluency until they have all of the confidence of a kindergarten teacher singing the ABC song. Of course, students might need to see a few examples of awesome read-alouds, which is where you, oh amazing teacher come in. If reading aloud isn’t your thing, click on the article above and fill the brains of your students with excellent examples from one of the YouTube channels listed in the article. Once they feel like the read-aloud rockstar they are, choose one of the platforms listed below and let them get on with their bad selves. Imagine the listening library that your students will create for one another. Imagine the fluency practice they will be getting! And don’t think that this idea is just for little kids. Big kids like to read aloud too. They can choose picture books or pieces of their favorite novels. Just get them reading and sharing their voice with their peers!
Flipgrid: Create an entire grid dedicated to read-alouds. Students can choose to sit in front of their devices and show the pages of their book as they read aloud, or you can rig up a stand where the camera points at the book only and the student narrates from behind the screen. Shockingly enough, some of our students are a little camera shy. Students can then visit the read-alouds of their classmates, leave feedback, or suggest new titles for their friends to read. I bet you will find there is a lot of natural voice-over talent in your classrooms.
Seesaw: Students can add their read-alouds to their journal and their stories can be shared with families and other students in the classroom. Just like with Flipgrid, students can either hold their books in front of the camera or can hide behind the camera as they turn pages and bring their stories to life.
Padlet: Padlet has a nifty tool that allows you to record a video directly into a Padlet post. You can create a shared Padlet and student can record right on the Padlet for their classmates to see. The only drawback to the Padlet is that videos can only be five minutes long. This might be a great option for those shorter, favorite passages from older readers.
Screencastify: Using the free Screencastify chrome extension, students can record their read-aloud using their Chromebook camera and microphone. Once their video is recorded, students can then put their videos into a Google Slide presentation or upload directly to a class YouTube channel. If it were me, I would create shared Slides presentations that were themed by genre. Then I would put the links to the Slides presentation in Google Classroom, students could create their videos and add them to the correct presentation. My favorite part about this is that you will have have a library of read-alouds that you can use with future classes.
I would love to hear your ideas about how you would get your students creating their own read-aloud. What tools would you use? How would you get them to interact with your new library? How will you motivate them to join in?
Math and GSuite have not always gone hand-in-hand. If you wanted to create math-rich Docs or Slides, you were pretty limited in formatting options, and many teachers wound up relying on screenshots and snipping tools to create materials for students. But, rejoice, for now there is EquatIO! The EquatIO extension allows you to add real math language to Google Docs, Slides and Forms. Equations, graphs, formulas, etc are all easy to create and use with your students.
Once you install the extension, you will have a new toolbar available in your GSuite products. With this toolbar, you can create expressions, formulas; all that crazy math stuff that I really don’t understand.
EquatIO Toolbar – Available in Docs, Slides and Forms
Not only does EquatIO offer an easy to use equation editor that allows the teacher to either type or dictate mathematical sentences, it also has a nifty prediction tool that helps you add the correct math symbols in your work.
If you are more of a talker than a typer, try the voice input option. When you speak your problem, EquatIO will create the sentence for you. If you want to allow students to talk through their problem solving, they can continue dictating their thinking and add additional lines to their math as they work towards the solution.
EquatIO has paired with Desmos to offer an easy to use graphing tool.
Another bell and whistle EquatIO offers is the ability to handwrite your math. If you are one of the lucky ones and have access to a tablet or touchscreen, you can handwrite all of your amazing math problems.
Sometimes we find the material we want to share with our students online. EquatIO offers a screenreader that not only grabs math from other digital locations and transfers it to your document, it also reads it to you! Here it is in action:
Since the free student EquatIO accounts are limited to Google Docs, I can create all of this math in a doc and then assign it via Google Classroom with the “Make a Copy” option. My students will then be able to use the same tools as they solve my problems. Well, not my personal problems, just my math problems.
EquatIO’s mathspace
Sometimes our math involves more than just numbers and letters and this is where EquatIO’s mathspace comes in. Instead of just adding equations and formulas to a Google Doc or Slide, EquatIO’s mathspace gives you a blank canvas where you can create the math (or chemistry or physics) problems of your dreams!
When you go to equat.io, you will first land on your EquatIO dashboard. Once here, you can create a new mathspace or you can edit/work with an existing one.
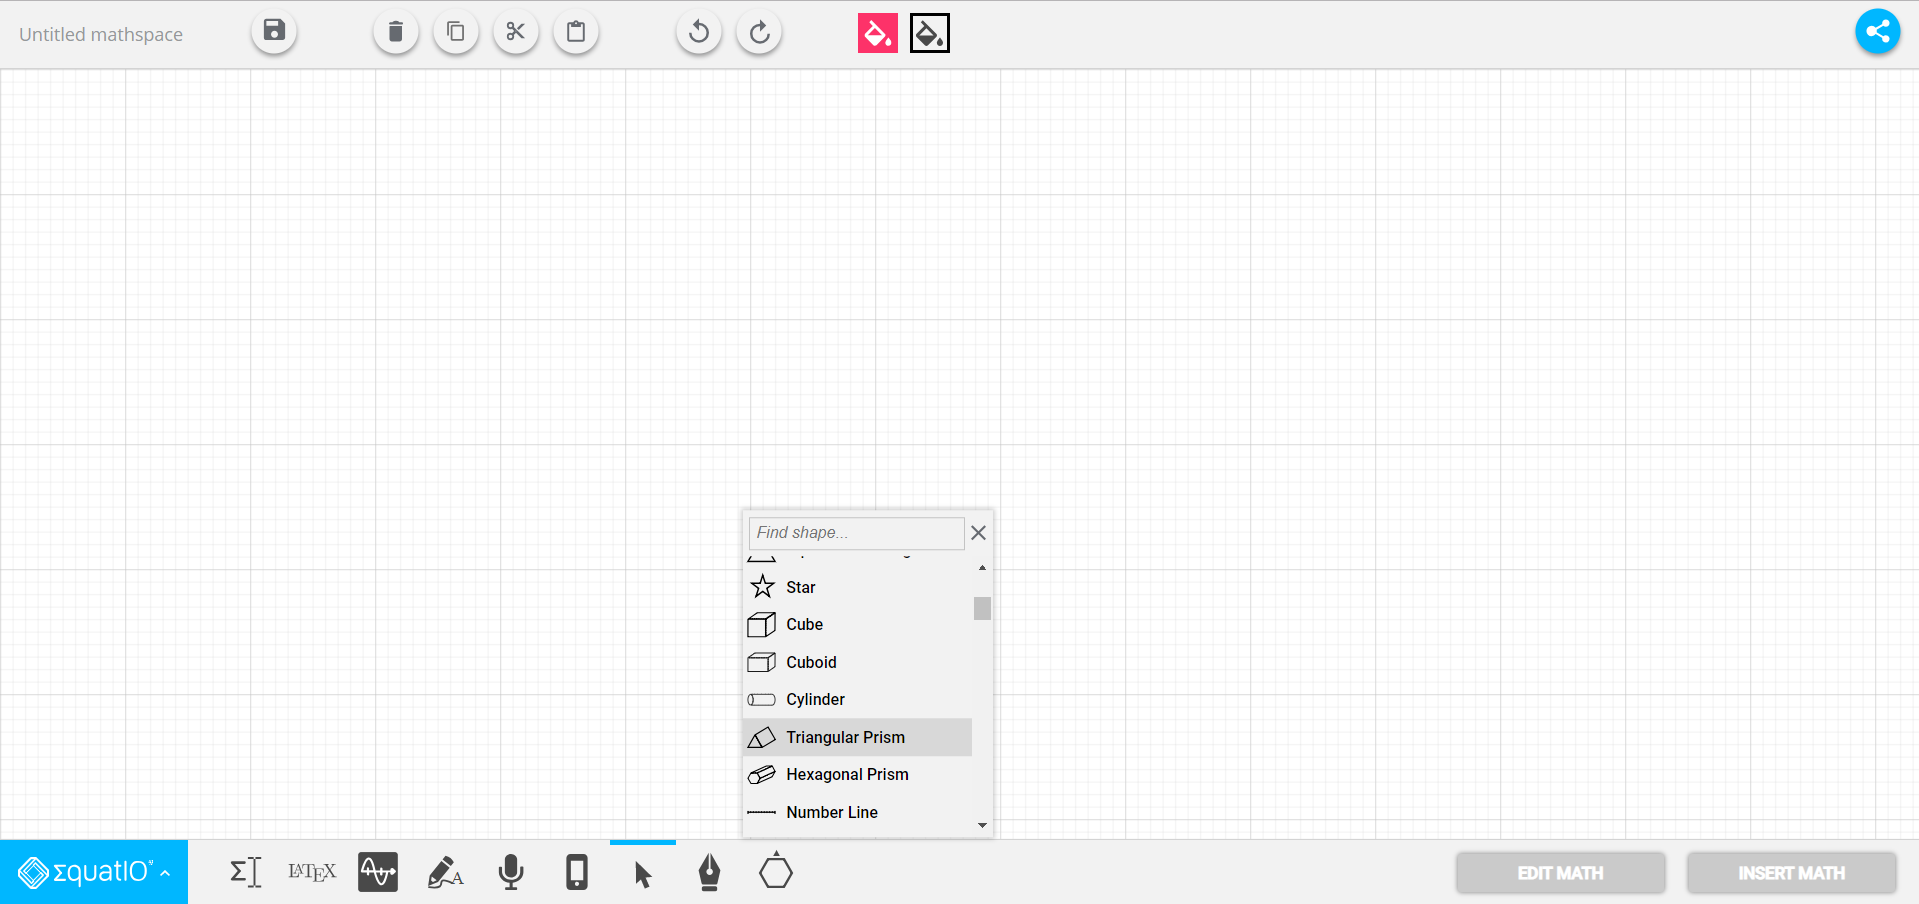
The mathspace canvas is amazing! In addition to the equation editor, you have a freehand draw tool and access to a variety of shapes, symbols and clip art.
Different shapes and symbols available in the mathspace canvas.
This space now becomes an interactive math problem.
The teacher can create on the canvas and then share a link to the problem in Google Classroom with the “Make a Copy” option. As a user of a free account, your students will not be able to respond directly on the canvas you have shared, but they can open their own mathspace, construct their response and then turn in their work by adding a link in Classroom.
I am not a math or science teacher, but these tools really excite me. The EquatIO extension and Equat.io mathspace create endless possibilities! To get your free educator account for EquatIO, click here!
I love Google Classroom. I think it creates an easy way to manage workflow of assignments in the classroom, and if you supercharge your Google Classroom, you can create amazing learning opportunities that were previously impossible.
The one thing I don’t love about Google Classroom is the calendar view located under the three bars on the left in Classroom. If you create an assignment with a due date, Classroom will helpfully create an event on the Classroom calendar. That is basically it. The teacher is unable to add any additional events to the calendar, which makes it frustrating if you want to add reminders, special events, or long range dates that are not tied to assignments.
But did you know that your Classroom calendar actually shows up in your regular Google calendar? And did you know that your students also have access to that calendar from their regular Google calendar? You can add any event to your Classroom by visiting your regular calendar. Once you have added the event to the calendar, it will show up on their school Google calendars. Of course, you will have to show your students where to find their Google calendar. Most students aren’t even aware that they have a calendar! I was working with freshman at the high school last week and one of the kids exclaimed, “How did I not know this was available? I would have been using it if I knew!”
Here is a short (2 minute) video that shows how this process works. I think getting our students to start using their calendars could cause an organizational revolution. And, brother, I am there for that!
This summer, I attended a conference and Joe Sanfelippo, the author of Hacking Leadership and The Power of Branding, was a keynote speaker. He passionately spoke with us about the idea that educators need to share what is happening in our classrooms with our families and the community at large. Joe wants us to build relationships while we flatten the walls of our school and broadcast student voices. A major point he hit on is that we need to share our stories to build relationships with our families because if we don’t show them what we are doing in our classrooms all day, families create their own truths. By using tools like Twitter, Facebook, and Instagram, we can reach our families and give them a peek into what is happening in our classrooms every day.
I love his ideas and his passion, but I know that some teachers are hesitant to begin this journey because they feel that they don’t have time to be snapping pics and crafting posts for the interwebs to view. They are more focused on the teaching and learning that is going on in their classrooms and not necessarily on sharing all of the wonderful things that are happening within their walls.
Would you be excited if I told you that there is a tool out there that allows you to inspire learning, engage your students, create amazing activities, give students opportunities to explain their thinking and share their voices, and communicate with parents all while saving teacher time? Well, there is a tool and that tool is called Seesaw!
Seesaw is considered to be a digital portfolio and while it is definitely a place where students can collect and reflect on their learning, it is so much more than a digital portfolio. Seesaw gives students powerful creative tools to capture their learning but it doesn’t stop there. Once students have added materials to their online journal, those learning moments are then shared with their teachers and even more importantly, their families! Families can view their child’s work in the Seesaw app right from their phone, tablet or computer. And since families are already connected, the teacher can send out daily updates, announcements, cute pics of students at work, videos of happenings in the classroom and weekly newsletters.
As a communication tool, Seesaw gives students an audience for their work. It gives families a window into what’s going on every day in their child’s classroom. It, as Joe Sanfelippo suggests we do, flattens the walls of your school and broadcast student voices. Teachers can quickly and easily share all of the amazing things that happen every day in their classroom with just a few clicks of a button.
As a teaching and learning tool, Seesaw excels! The teacher can create activities for students to engage with. These activities can be varied, but the point of them is that it is an opportunity for students to “show what they know.” Seesaw gives students creation tools like a camera to create a video or still images, and drawing tools and text features so that they can explain a concept, write and reflect, capture an experiment or share their newfound knowledge.
When you see Seesaw in action, you will know that it is going to be the tool that will be a game changer for you. I found this awesome video from fellow user, Suzanne Awrtey, that shows some quick ideas about using Seesaw with primary age children. If you don’t want to watch the entire video, check out clips at 2:44, 3:12, 4:10, 4:43 and 5:49.
It might seem overwhelming for a teacher new to Seesaw to come up with activities for their students, but fear not for Seesaw now has a library with activities that are already created by fellow teachers. Browse through and select activities that match your grade level and subject, hit the “Share” button, and you are in business! Just look at some of the amazing activities I found!
This slideshow requires JavaScript.
Once you begin using Seesaw in your classroom, you will find that Seesaw makes the paperwork beast easier to manage since you won’t be lugging papers back and forth every night. Instead, you can see and hear what your students are thinking and create new opportunities for learning based on their responses. The best part is that Seesaw works on all devices! It works in an environment where every student has a device just as well as in a room where you only have 1 or five devices. Students can still use Seesaw as part of a center activity or as a journal activity. You don’t have to be 1:1 to be able to implement Seesaw in your classroom.
As you are reading about Seesaw, you might be worrying about who will be able to see the work of each student. Don’t worry because privacy is a big deal with Seesaw. By default, all student accounts are private to the classroom only and you decide when it is time to begin sharing student work. When you are ready, you invite parents to be a part of your Seesaw community, and once they join, they only have the ability to see the work of their own child or any announcements that you send to the class. And unlike other tech companies, Seesaw doesn’t collect or sell student and teacher data, nor do they claim ownership of any material you put into Seesaw.
The takeaway from all of this is that Students are empowered when they use Seesaw. The creative tools allow for choice, collaboration, and sharing. During this process students reflect and apply critical thinking skills, and these insights are shared with important audiences.
Who is Seesaw for? Every student from PreK to grade 12. And the best part? Seesaw is free for teachers and families! The free Seesaw account allows the teacher to have up to three Seesaw classes and 100 activities in use. Of course, if you fall in love with Seesaw, there are upgraded options that give you even more of the good stuff.
To get started with Seesaw, go to seesaw.me and create a free account. Or, if you want to try out Seesaw Plus for 30 days, click on this link before you create your account. One of the awesome things about Seesaw is their PD program where you can be a self-directed learner by using their “Help” center. In fact, here is their “Get Started” guide. They also have an amazing PD in your PJs program to help you learn at your own pace.
What are you waiting for? School is starting and your students are ready to share their voices! Make Seesaw a part of your classroom this year.