Does your Google Drive or your GMAIL feel like a giant black hole where you can never find what you are looking for? Have you ever wondered how to make the most of your internet searches? Check out this week’s Tech Tuesday which is all about how to be a Savvy Searcher in your Drive, GMAIL, and online. Learn tips and tricks that will have you digging for gold, er, your materials, and actually finding them!
In the past, I have always recommended that you make a copy of your Google Classroom so that you have a clean copy to use with your students for next year. However, what I have begun to see for those of you that have very material and video heavy Google Classrooms is that the new copy you have created is missing materials or seems to get caught in a loop where your videos never process correctly or attachments are gone. I have done some research on this issue and can’t find a really good solution within Google, so I am suggesting that you take the following steps and create what is considered a “Master Classroom.” This master classroom will contain all of your content, in descending (whatever you assigned last will be at the top) order, but will be a repository that you can use to assign (by using the “reuse assignment” option) into a new Classroom. That way, all of your original content is still there, you can see what order you assigned it, but you don’t have that terrible moment where you and your students discover that the content you thought was in your Classroom really isn’t there.
To create your new “Master Classroom”:
Return all student work
Remove students from the Google Classroom
Rename your Classroom to “Master Classroom” or whatever other moniker helps you remember what you are going to use it for.
At the beginning of the next school year, create a “NEW” classroom and use the “Reuse assignment” option to pull the content from your “master classroom” into the new classroom. This way, it will create an assignment or material that you can give a current due date to your students.
Your new master class is going to work as that old fashioned plan book that we used to write every single lesson into! You can now scroll through topics and assignments that you have used in the past and reuse them in your new Google Classroom. The benefit of this is that in your master classroom, all of the assignments, materials and topics are already published because you used them in the past. When you reuse them in your new Classroom, it puts them back into draft form, allows you to edit or add new materials, and assign new due dates to your new students. To reuse a post:
Open your new Google Classroom
Click on Classwork
Click + Create
Click Reuse post
Select your master class from the list
Find the assignment of material, click on it and click “Reuse” in the bottom right
DO NOT SELECT “Create new copies of all attachments” because it will make a mess in your Drive
Your assignment or material is now in draft mode. You can add new directions and materials or remove old content you do not wish to use. You can give a new due date or schedule the assignment. You can add plagiarism checking, assign to individual students, or just leave the assignment/material in draft mode for when you are ready to to use it.
To see how to use the reuse option, watch this short video (no sound).
As you are wrapping up the school year, there are a few housekeeping items that you should attend to when it comes to your Google Classroom.
The best procedure to close out your year is to: 1. Return all student work 2. Make a copy of your Classroom if you would like to reuse it next year 3. Archive your current Classroom
If your Google Classroom is not content heavy and you want to be able to use it again next year with your students, you should make a copy of the Classroom so that all materials go back into draft form so your new students will not be confused by materials that you used with previous students. Simply deleting this year’s students from a Google Classroom and reusing it with new students actually creates more work for you in the long run since all materials are already published, are assigned with due dates, and have student work associated with them. When you create a new copy of your current Google Classroom, you are setting up a clean environment that still has your materials, just in draft form that can be published when you are ready. When you archive your old Google Classroom, your previous students will still find all of their assignments and materials in their Google Drives and will still see an archived version of the course if they dig deep into the Classroom menu, but the Classroom will be view only and students will not be able to change or edit anything in the Classroom itself.
When you make a copy of your Google Classroom, all content on the Classwork section of Classroom is automatically put into draft mode. You will then be able to go in and publish each item as you are ready to use it. Even better is that before you publish it for students, you can edit the assignment or material to update it for the current year. It really is a win-win situation. The only problem with making a copy of a current Class is that only the content on the Classwork page is copied. Materials on the Stream will not copy.
Follow the steps below to wrap up your Google Classroom for the year.
Return all work: You want to return all student work so that Google moves it from your drive to their drive. Otherwise, you will be wading through student work in your Drive until the end of time. The fastest way to return student work is to:
Open a specific Classroom
Click on the Grades link from the menu on top
Click on the three dots to the right of each assignment name
Select “Return All”
Click “Return”
Move to the next assignment and repeat
Make a copy: If you want to reuse the same class for next year (see above to understand why it is better to start with a fresh class rather than delete students from the current class) or you want a copy of your class for reference:
Go to classroom.google.com
Click on the three dots on the right of the Class tile that you want to copy
Select “Copy”
If your Class has a lot of content, it can take some time to make a copy. You will receive an email from Classroom once your copy has been made.
Archive the Class: Clean up your Classroom view by archiving your Class. Don’t worry! You still have access to the archived class and can pull content directly from that class into a new class with just a few clicks of a button. To reuse archived content,
Go to classroom.gooogle.com
Click on the three dots on the right of tile of the class to be archived
Select “Archive”
Don’t forget that you can always reuse materials from archived Classrooms. Just because they aren’t viewable on your current dashboard doesn’t mean that they are gone forever!
If you have a content heavy Google Classroom, you might discover that making a copy leaves you with missing content and videos. If that is the case, try my suggestion for making a “Master Google Classroom” from this post.
We have been using Google Classroom in our district for a long time now, but I feel like admin are still a little shaky when it comes to their understanding of the functionality of Google Classroom. A few of them jumped on the bandwagon in the early days of adoption and made a classroom for staff communication, but by-and-large, they have kind of abandoned the medium for their own uses. I think it is important that admin have conversations with their teachers about how they are using Google Classroom, so I made these quick guides for admins to use. One is focused on how the “Stream” functions and the other is on the nuts and bolts of the “Classwork” page.
Google Classroom StreamGoogle Classroom Classwork
What do you think? Will these drive conversations in the right way? Am I missing something that you think I should add? Let me know in the comments! If you would like a copy of these for yourself, here is the link to the Google Slide I used to create them.
During this pandemic, it has become increasingly clear that caregivers and students need a one-stop shop where they can get information about the happenings of our classrooms. Knowing that caregivers cannot actually take a look into Google Classroom without signing in as a student, many teachers have turned to Google Sites to create informational classroom websites.
A useful feature that you can add to your website is you Google Classroom Calendar (or any Google Calendar that you create to keep caregivers and students informed.) When you add the Google Classroom calendar, students (and caregivers) can easily see when assignments are due. They can also get assignment details by clicking on the assignment while viewing the calendar. As I have mentioned before, I have a son who needs a ton of parental management. Being able to see what is due and when it is due without having to sign in as my kid makes my life a lot easier. I am sure I can’t be the only parent out there who has to be “in charge” of learning at home!
With the quick insert feature available in Sites, you can add a calendar in just a few clicks. However, before you get started on that, you need to make sure that the calendar is visible to viewers outside of your domain. This requires you to go to your Google Calendar and change a view setting.
To see how to add a Google Calendar and make sure your settings are correct, watch this short video.
My full time job is to serve as an instructional technology specialist/coach for a small district in Southwest Ohio. Last year, I ran a badging program for my staff. The whole purpose of this program was to slowly introduce teachers to the features of tech tools and then show them how to use those tech tools with students.
The tools I focused on are all things that are in house at my district. I covered Google tools like Google Classroom, Docs, Slides, screencasting and more. There were a few district or state specific tools in there, but for the most part, each training is designed around a program that is free to use. When you look at the materials, anything that is labeled as “Pathfinder” is designed to teach about the basics of the tool. How do you create an amazing doc? Look in the Pathfinder Docs Toolbox badge. You can do all that with Slides? Oh, yes you can. Just look at the Slides Superpowers pathfinder badge. Did you know you can put audio in your Slides? Find out more in the Slides Audio pathfinder badge.
The trailblazer badge for each tool is how you turn around and use that tool in meaningful ways with students. The focus of that challenge (as I call them) is to create teaching and learning opportunities that use the tool as a base. The program was very successful and so many teachers said that completing the challenges helped to prepare them for remote learning.
I want to share these challenges with you, my dear reader. Feel free to look at my badging site: lcspd.org and explore the different materials available to you. If you look under the 19-20 challenge page, you will find 24 learning opportunities.
If you take a look at my site and decide to use it, I ask two things!
1: Drop me a comment and tell me how my site helped you do something amazing with your students.
2: Do not take and reuse my stuff without giving me credit. I happily and freely share my work and it really bums me out when I see it posted on someone else’s site or in TpT and no credit is given to me. All of my work has an attribution creative commons license. Please respect that.
Again, that website is lcspd.org. Take a look. I hope you find something valuable there.
Students have suddenly had to adapt to a new digital learning environment and it can be overwhelming even for the most organized student. If the student has one teacher and is in one Google Classroom, figuring out what needs to be done does not require much more than a quick check-in on the stream or classwork page. If the student has more than one teacher or is in more than one Google Classroom, figuring out what work needs to be completed can be time-consuming as students navigate to each of their classes and view the stream or classwork page for assignments.
There is a feature in Google Classroom that few people seem to be aware of, but can be an amazing lifesaver for students (and teachers)! It is the To-Do List.
If you are looking at your Google Classroom homepage, click on the three lines to reveal the link for the To-Do List.
Once you click on that To-do heading, all activities that have been assigned will appear in order of due date. If there is no due date attached, the assignment will be at the bottom of the list. As you can see, my student has some serious work to do.
Each class has a sidebar color that matches the heading color of the classroom the work came from, but you can also see which class the assignment is from if you look under the title of the assignment. To access the assignment, simply click on the title of the assignment and it will take the student right to the directions and attachments for said assignment.
Students can also click on the “Done” tab and see all assignments that have been turned in along with any digital grades that have been given.
So, my fabulous teacher friends, let your students know about this amazing feature in Google Classroom. I guarantee that you will be helping at least one of your students get a better handle on how to manage their workload. And teachers, did you know that you also have a to-do list? It helps you know what you need to grade and return to your students. (Remember to return graded work to your students so that it doesn’t live in yourGoogle Drive for the rest of your life!)
I love Google Drawings and frequently share it with teachers and students because it is a great tool for teachers to use to create the assets they need for instruction. Students can create pieces that let them show what they know or create their own images for a project. If you aren’t familiar with Drawings, check out some of the other posts I have written about their awesomeness.
The only drawback that I find when I use Drawings is the ability to freehand draw is very limited. Drawings has some native line tools, but they are clunky to use and the scribble line doesn’t really allow the user to do much more than, er, well, scribble.
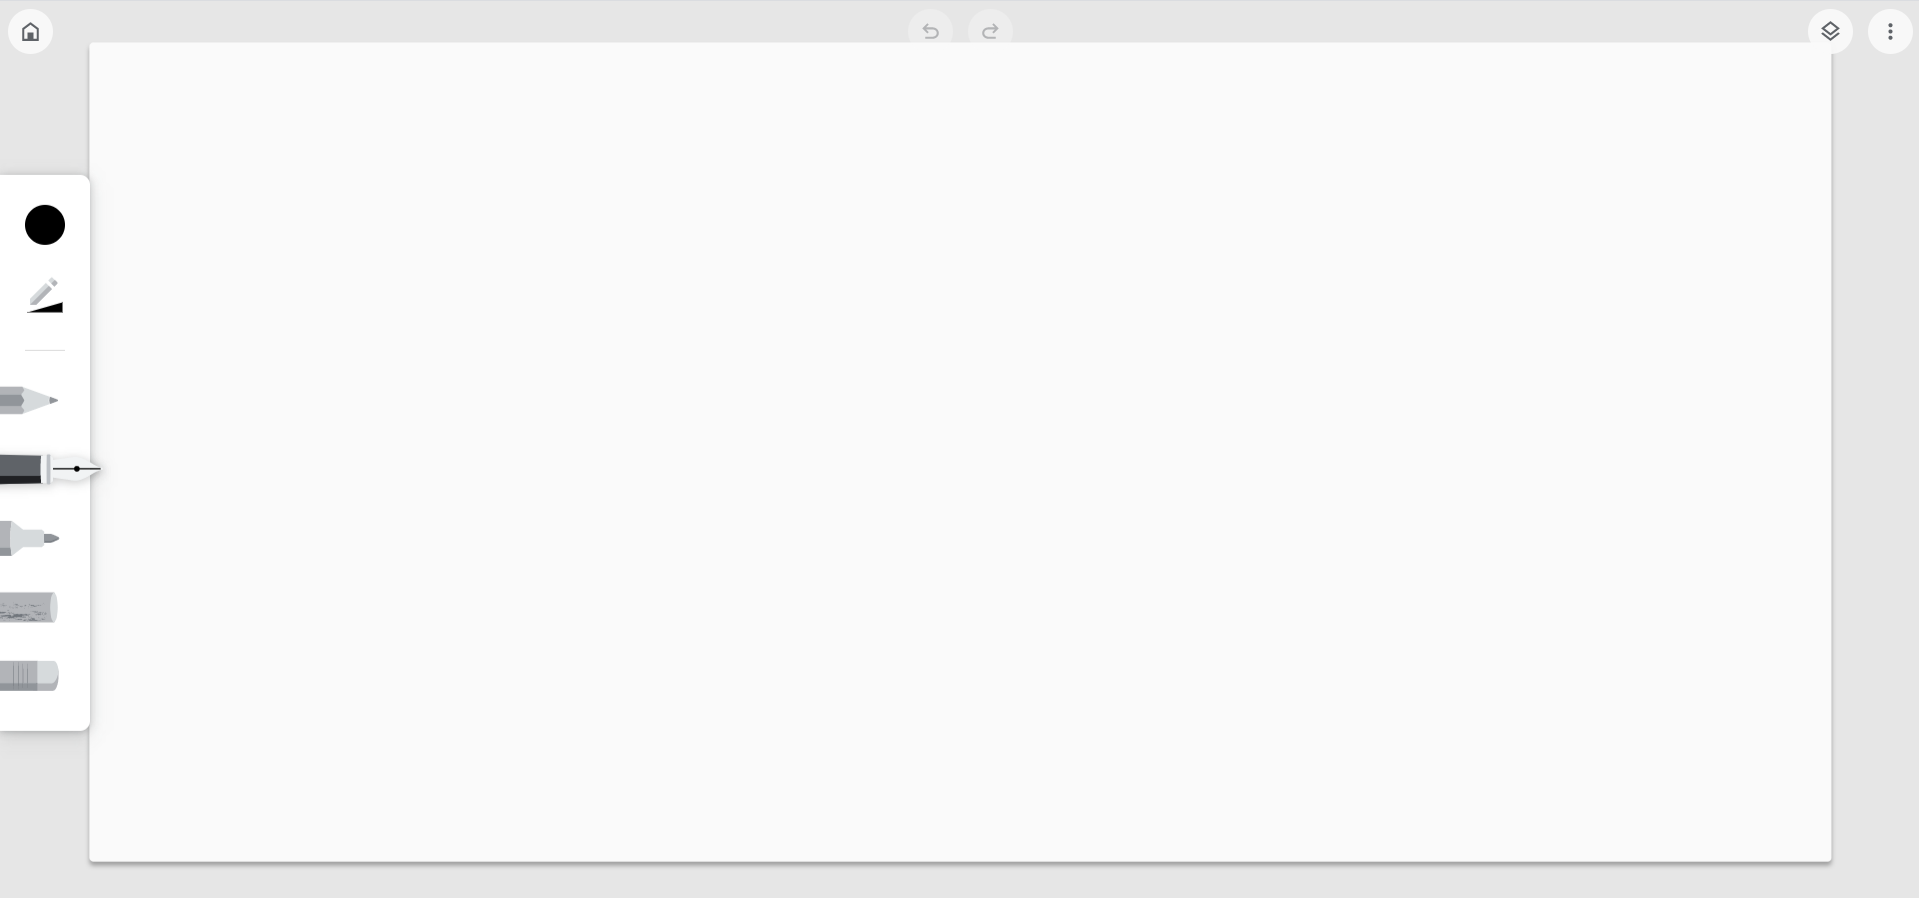
That is why I was so excited when I discovered Chrome Canvas! Chrome Canvas (https://canvas.apps.chrome/) is truly a drawing tool, complete with a blank canvas, different pen and pencil types, personalization of color options, and the ability to add layers to any drawing.
Blank canvas just ready for creation!
While I can use shapes and masking in Drawings to create, I have never been able to hand draw any of the elements I want. Canvas allows me to use my mouse or stylus to draw whatever I can dream up. (Caveat, I am not a very talented artist. My artistic career pretty much ended when I gave up safety scissors.)
Change drawing tools, tip size, opacity and color to create the sketch of your dreams.
When using Canvas, you can begin with a blank canvas or you can start with an image that you intend to create on.
Use any image as the base to your Canvas drawing
Unlike Drawings, which have ordering (move to the front or move to the back) options, Canvas users will need to use layers to create scenes or images that require more fine tuned artistry, but the layers are easy to use and can be hidden, deleted or made transparent.
Each part of this amazing drawing is a different layer. I can change each part as needed without ruining my other work.
Once your Canvas masterpiece is finished, you simply click on the three dots on the bottom right of the thumbnail and save your work as an image.
This is some fine artistry
The image will automatically save to your downloads folder on either your computer, laptop or Chromebook. Once it has downloaded, you can do whatever you like with it; even add it to a Google Drawing (or any other GSuite product).
Canvas lives as an app right in your Chrome browser and is free to use. This free tool opens up more possibilities when students and teachers are looking for ways to create and show their awesomeness!
The ability to add audio to slides has been on my want list since I started using slides years ago. Those of us who were PowerPoint users fondly remember the day when we could add a lovely melody to play over our entire presentation, but we were sadly shut out of this feature when we made the jump to slides.
Well, be sad no more for the ability to insert audio to Google Slides is here! (Or will be here for all users by the end of November if the rumor holds true) This feature is not just for playing sappy music over a photo show of your students at the end of the year; this feature is perfect for so many different teaching and learning activities!
But first, let’s look at how to use the feature. It is relatively simple.
First, you must have the audio file (it should be an MP3 file) in your Google Drive. You can easily use the New < File Upload feature to upload any audio files you might have on your computer. Need to make your own audio files? Check out my blog post about using Screencastify to create your own MP3.
Open your Google Slide presentation. (Remember, if you are starting from scratch, you can type slides.new into your URL bar to quickly create a brand new presentation).
Click Insert and select Audio from the dropdown list.
Once you have inserted the audio, you can choose how your audio will play
You can change the audio icon to an image of your choice if you so choose. Simply click on the audio icon and click “Replace image” from the toolbar. You can either pull an image from your Drive, computer or photos or you can search the web. (Excuse the yucky food images in my gif. I am in the process of lodging a complaint about my bean burrito with a certain fast food chain. 😉)
That’s it! That is all you need to do to add audio to Google Slides. Check in for my next blog post about ideas for using this new feature in your classroom. I mean, beyond that end of the year cry fest when your students fly away and leave you with nothing but the memories.
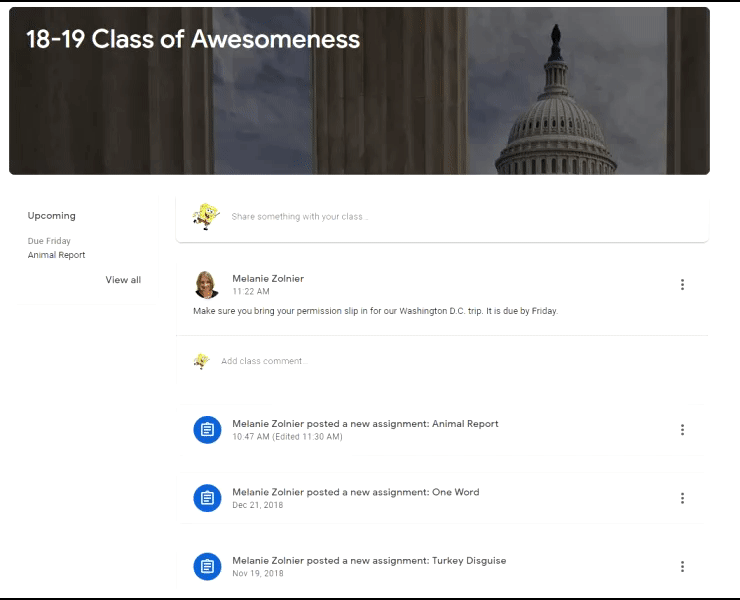
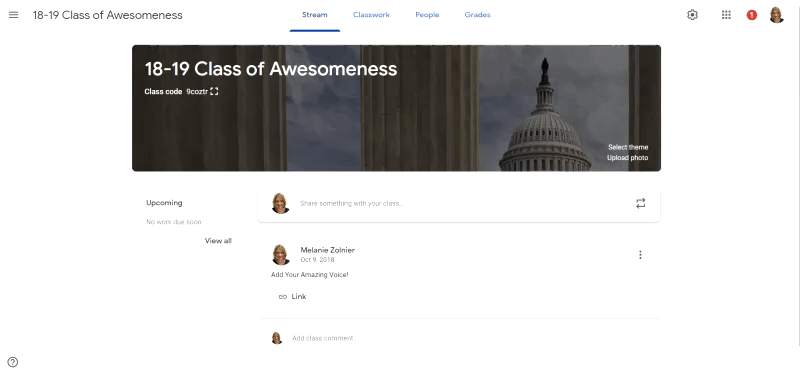
I opened up my Google Classroom this morning to find the most awesome update ever! My biggest complaint about the updated classroom for the 18-19 school year is that I felt like the Stream was a hot mess of information and that for some of our students, the visual noise was too much for them to deal with. Announcements, assignments, student comments – all flooded the stream.
But as of today, I can control exactly how my Classroom Stream looks. My three options are:
Show attachments and details
This option will keep your Stream looking exactly the same as in the past – no changes will be made.
Teacher Stream with all details
Student Stream with all details
Show Condensed Notifications
This view minimizes the assignments and collapses all the content. Stream shows full announcements, but only titles of assignments.
Cleaner view – Announcements are still mixed between assignments, but there is less visual noise.
Clicking on the title takes the teacher directly to the grading view and takes students to the directions and attachments.
Hide Notifications
This will remove everything from the stream except for announcements (and if you have them allowed, student stream comments). With this view, students will have to navigate to the Classwork page to be able to see and interact with assignments.
To access these new options, click on the setting gear in the upper right-hand corner and look for the “Classwork on the stream” option.
You also have the ability to move any items, assignments or announcements to the top in the Stream. Now, if only Google would let us pin items to the top, all of my Google Classroom dreams will come true!


 Now, if only Google would let us pin items to the top, all of my Google Classroom dreams will come true!