Posted in Cool Tools, Creating Accessibility, Google Slides, Google Workspace for Education, how to

Add Audio to Google Slides

The ability to add audio to slides has been on my want list since I started using slides years ago. Those of us who were PowerPoint users fondly remember the day when we could add a lovely melody to play over our entire presentation, but we were sadly shut out of this feature when we made the jump to slides. 

Well, be sad no more for the ability to insert audio to Google Slides is here! (Or will be here for all users by the end of November if the rumor holds true) This feature is not just for playing sappy music over a photo show of your students at the end of the year; this feature is perfect for so many different teaching and learning activities! 

But first, let’s look at how to use the feature. It is relatively simple. 

  1. First, you must have the audio file (it should be an MP3 file) in your Google Drive. You can easily use the New < File Upload feature to upload any audio files you might have on your computer. Need to make your own audio files? Check out my blog post about using Screencastify to create your own MP3.  
  2. Open your Google Slide presentation. (Remember, if you are starting from scratch, you can type slides.new into your URL bar to quickly create a brand new presentation).
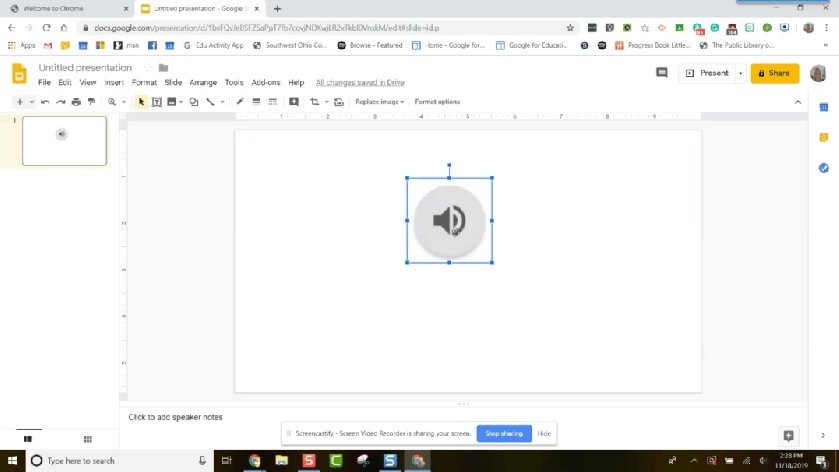
  3. Click Insert and select Audio from the dropdown list. Add Audio to Slides
  4. Once you have inserted the audio, you can choose how your audio will play Format Options
  5. You can change the audio icon to an image of your choice if you so choose. Simply click on the audio icon and click “Replace image” from the toolbar. You can either pull an image from your Drive, computer or photos or you can search the web.  (Excuse the yucky food images in my gif. I am in the process of lodging a complaint about my bean burrito with a certain fast food chain. 😉) Replace audio icon

That’s it! That is all you need to do to add audio to Google Slides. Check in for my next blog post about ideas for using this new feature in your classroom. I mean, beyond that end of the year cry fest when your students fly away and leave you with nothing but the memories.

Posted in Google Slides, how to, Screencastify

Use Screencastify to Create Audio Clips

With the rollout of add audio to Slides finally on the move again, it is time to start thinking about how you are going to create the audio clips you need to make your Slides sparkle. Well, maybe not sparkle, but definitely be a resource for teaching and learning!

If you are a premium Screencastify customer, you might have missed their quiet roll-out of the export audio feature. With this feature, you can pull just the audio from any of your Screencastify videos.  The audio will export as an MP3 file, which is exactly what you need to take that audio clip on the road! You can use the audio file just about everywhere, but especially as an audio file on your Google slide! 

To make the most awesome teaching and learning Slides ever, all you have to do is record your video, export the audio, and add it to Slides with the Insert > audio feature. Imagine the possibilities!

  • Oral directions
  • Read aloud text
  • Phonetic practice
  • Language acquisition activities
  • Hint/cheat codes
  • Explainer notes
  • Student read alouds

Goodness, there are so many amazing things that you can do with audio in Slides as long as you know how to create that ever important audio file.

Creating that MP3 file is very easy. Just open Screencastify as you normally would and record your video. It doesn’t matter if you record using the webcam, desktop or tab view because all that matters is the sound of your voice. Once you have finished your recording and the preview/share screen for your video pops up, simply click the downward pointing arrow and select Export audio.

Export Audio

Since Screencastify automatically saves the audio clip to your Google Drive, you can now insert that clip right into Slides once the Insert > audio has hit your domain!

Happy recording!