Posted in Cool Tools, Creating Accessibility, Student Creation

Student Created Read-Aloud Videos of Awesomeness

Recently, I read the article “Best Read Alouds on YouTube” from the website We are TeachersThis article is full of great YouTube channels where favorite picture books are read aloud by a variety of personalities.

The read-aloud portion of my day was always one of my favorites. Whether as a classroom teacher or as a media specialist, I relished the opportunity to share my reader’s voice with my students. I tried to bring the story alive and I felt an inner sense of pride when the kids would listen to the story with rapt attention. But there is always a moment in my teaching life that has stood out. One year, I was teaching language arts to a really rowdy group of 8th graders, most of whom were reading significantly below grade level. We were doing a unit on poetry, slugging through the classics, when a student asked if he could read his favorite poem aloud to the class. I was so excited that he had a favorite poem that I immediately agreed and listened in awe as he presented us with an amazing version of My Beard by Shel Silverstein.

This performance kicked off a really cool string of days where the kids searched out their favorite poems, practiced reading them aloud and then performed them for the rest of the class. Student engagement was high, but most of all, students were practicing their fluency and really digging into text so that they were able to read their favorites with voices that would entrance and capture the attention of their classmates.

I am thinking that it is time for students to share their read-aloud voices with us. Instead of listening to an adult voice, it is their turn to bring stories to life. I know that we don’t have the time in our day to have 25-30 kids read their favorite stories or passages to the class, but we can use our technology to give them the chance to record their favorite stories for their classmates. (Or their parents, or their siblings, or just you, or really, just themselves)

Students can select their favorite picture book or passage from a book and practice their fluency until they have all of the confidence of a kindergarten teacher singing the ABC song. Of course, students might need to see a few examples of awesome read-alouds, which is where you, oh amazing teacher come in. If reading aloud isn’t your thing, click on the article above and fill the brains of your students with excellent examples from one of the YouTube channels listed in the article. Once they feel like the read-aloud rockstar they are, choose one of the platforms listed below and let them get on with their bad selves. Imagine the listening library that your students will create for one another. Imagine the fluency practice they will be getting! And don’t think that this idea is just for little kids. Big kids like to read aloud too. They can choose picture books or pieces of their favorite novels. Just get them reading and sharing their voice with their peers!

Flipgrid: Create an entire grid dedicated to read-alouds. Students can choose to sit in front of their devices and show the pages of their book as they read aloud, or you can rig up a stand where the camera points at the book only and the student narrates from behind the screen. Shockingly enough, some of our students are a little camera shy. Students can then visit the read-alouds of their classmates, leave feedback, or suggest new titles for their friends to read. I bet you will find there is a lot of natural voice-over talent in your classrooms.

Seesaw: Students can add their read-alouds to their journal and their stories can be shared with families and other students in the classroom. Just like with Flipgrid, students can either hold their books in front of the camera or can hide behind the camera as they turn pages and bring their stories to life.

Padlet: Padlet has a nifty tool that allows you to record a video directly into a Padlet post. You can create a shared Padlet and student can record right on the Padlet for their classmates to see. The only drawback to the Padlet is that videos can only be five minutes long. This might be a great option for those shorter, favorite passages from older readers.

Screencastify: Using the free Screencastify chrome extension, students can record their read-aloud using their Chromebook camera and microphone. Once their video is recorded, students can then put their videos into a Google Slide presentation or upload directly to a class YouTube channel. If it were me, I would create shared Slides presentations that were themed by genre. Then I would put the links to the Slides presentation in Google Classroom, students could create their videos and add them to the correct presentation. My favorite part about this is that you will have have a library of read-alouds that you can use with future classes.

I would love to hear your ideas about how you would get your students creating their own read-aloud. What tools would you use? How would you get them to interact with your new library? How will you motivate them to join in?

Posted in Cool Tools, Student Creation

Take The Boring Out Of Flashcards With Pear Deck’s Flashcard Factory

Flashcards are a tried and true educational tool that have a place in just about every classroom. From vocabulary words to math theorems to important places, flashcards have been used by students in just about every grade level.

Sometimes, students get together to drill each other on flashcards, but for the most part, the creation of flashcards is a very solitary experience. But now we can make the creation of flashcards a more collaborative activity for students by using Pear Deck’s Flashcard Factory.

two rectangles - the one on the left is for Pear Deck. The one on the right is for Pear Deck Vocabulary
Login to http://www.peardeck.com and select “Flashcard Factory.”

Using Flashcard Factory is a simple as 1, 2, 3:

One: Create your study set/vocabulary list in Flashcard Factory

Flashcard with the word "Cellular" and a highlighted definition from the dictionary
Write your own definitions or select a definition from Merriam Webster

TWO: Initiate the live activity with your students by clicking on the red “Play Flashcard Factory” button. Students will be paired up and separated into two groups; day shift and night shift. If you are unhappy with the groupings, you can use the shuffle button to remix the students. Once students have gone to sit with their partners, you can launch the factory and student pairs will draw images and write sentences that define the terms.

THREE: As a class, students and teachers review the created flashcards. If the flashcard is an awesome example of the definition of the term, it gets voted in. If the flashcard is weak and doesn’t pass muster, it gets left on the factory floor. Students are encouraged to discuss and debate each flashcard, building an even greater knowledge and understanding of the word.

When you have created a study set using student materials, you can then “ship” your new flashcards right to Quizlet. Quizlet then lets you share the completed study set with your students via Google Classroom so that they can study or play games with the sets when they are ready.

This slideshow requires JavaScript.

To use this new and awesome tool, go to www.peardeck.com and join up/sign in and click on “Start a Vocab List.” Happy flashcarding!

Posted in Building Relationships, Cool Tools, Creating Accessibility, Student Creation

Build Relationships and Engage Students With Seesaw

This summer, I attended a conference and Joe Sanfelippo, the author of Hacking Leadership and The Power of Branding, was a keynote speaker. He passionately spoke with us about the idea that educators need to share what is happening in our classrooms with our families and the community at large. Joe wants us to build relationships while we flatten the walls of our school and broadcast student voices. A major point he hit on is that we need to share our stories to build relationships with our families because if we don’t show them what we are doing in our classrooms all day, families create their own truths. By using tools like Twitter, Facebook, and Instagram, we can reach our families and give them a peek into what is happening in our classrooms every day.

I love his ideas and his passion, but I know that some teachers are hesitant to begin this journey because they feel that they don’t have time to be snapping pics and crafting posts for the interwebs to view. They are more focused on the teaching and learning that is going on in their classrooms and not necessarily on sharing all of the wonderful things that are happening within their walls.

Would you be excited if I told you that there is a tool out there that allows you to inspire learning, engage your students, create amazing activities, give students opportunities to explain their thinking and share their voices, and communicate with parents all while saving teacher time? Well, there is a tool and that tool is called Seesaw!

Seesaw is considered to be a digital portfolio and while it is definitely a place where students can collect and reflect on their learning, it is so much more than a digital portfolio. Seesaw gives students powerful creative tools to capture their learning but it doesn’t stop there. Once students have added materials to their online journal, those learning moments are then shared with their teachers and even more importantly, their families! Families can view their child’s work in the Seesaw app right from their phone, tablet or computer. And since families are already connected, the teacher can send out daily updates, announcements, cute pics of students at work, videos of happenings in the classroom and weekly newsletters.

As a communication tool, Seesaw gives students an audience for their work. It gives families a window into what’s going on every day in their child’s classroom. It, as Joe Sanfelippo suggests we do, flattens the walls of your school and broadcast student voices. Teachers can quickly and easily share all of the amazing things that happen every day in their classroom with just a few clicks of a button.

As a teaching and learning tool, Seesaw excels! The teacher can create activities for students to engage with. These activities can be varied, but the point of them is that it is an opportunity for students to “show what they know.” Seesaw gives students creation tools like a camera to create a video or still images, and drawing tools and text features so that they can explain a concept, write and reflect, capture an experiment or share their newfound knowledge.

When you see Seesaw in action, you will know that it is going to be the tool that will be a game changer for you. I found this awesome video from fellow user, Suzanne Awrtey, that shows some quick ideas about using Seesaw with primary age children. If you don’t want to watch the entire video, check out clips at 2:44, 3:12, 4:10, 4:43 and 5:49.

It might seem overwhelming for a teacher new to Seesaw to come up with activities for their students, but fear not for Seesaw now has a library with activities that are already created by fellow teachers. Browse through and select activities that match your grade level and subject, hit the “Share” button, and you are in business! Just look at some of the amazing activities I found!

This slideshow requires JavaScript.

Once you begin using Seesaw in your classroom, you will find that Seesaw makes the paperwork beast easier to manage since you won’t be lugging papers back and forth every night. Instead, you can see and hear what your students are thinking and create new opportunities for learning based on their responses. The best part is that Seesaw works on all devices! It works in an environment where every student has a device just as well as in a room where you only have 1 or five devices. Students can still use Seesaw as part of a center activity or as a journal activity. You don’t have to be 1:1 to be able to implement Seesaw in your classroom.

As you are reading about Seesaw, you might be worrying about who will be able to see the work of each student. Don’t worry because privacy is a big deal with Seesaw. By default, all student accounts are private to the classroom only and you decide when it is time to begin sharing student work. When you are ready, you invite parents to be a part of your Seesaw community, and once they join, they only have the ability to see the work of their own child or any announcements that you send to the class. And unlike other tech companies, Seesaw doesn’t collect or sell student and teacher data, nor do they claim ownership of any material you put into Seesaw.

The takeaway from all of this is that Students are empowered when they use Seesaw.  The creative tools allow for choice, collaboration, and sharing.  During this process students reflect and apply critical thinking skills, and these insights are shared with important audiences.

Who is Seesaw for? Every student from PreK to grade 12. And the best part? Seesaw is free for teachers and families! The free Seesaw account allows the teacher to have up to three Seesaw classes and 100 activities in use. Of course, if you fall in love with Seesaw, there are upgraded options that give you even more of the good stuff.

To get started with Seesaw, go to seesaw.me and create a free account. Or, if you want to try out Seesaw Plus for 30 days, click on this link before you create your account. One of the awesome things about Seesaw is their PD program where you can be a self-directed learner by using their “Help” center. In fact, here is their “Get Started” guide. They also have an amazing PD in your PJs program to help you learn at your own pace.

What are you waiting for? School is starting and your students are ready to share their voices! Make Seesaw a part of your classroom this year.


Posted in #onenewthing, Creating Accessibility, Google Classroom, Student Creation, Teacher Workflow

Spend Your Summer Trying #OneNewThing

It is almost time for summer break, where all teachers stop working and spend the summer working on their tans while they sip frosty beverages by the pool!

HAHAHAHAHAHA….excuse me for a second. I think I might have just laughed so hard that I peed a little.

This summer, like every summer, most of us are going to spend significant time on our teaching craft. Self-directed learning, grad classes, conferences, seminars, professional books, team plannings, curriculum overhauls; you name it, we are doing it.

My district is hosting a Twitter challenge where teachers are encouraged to tweet about one new thing they are working on this summer. This new thing can be something for school or something personal. For example, my #onenewthing on a personal level is I am going to try running a mile…without dying. On a professional level, my #onenewthing is attending ISTE for the first time to hopefully learn more about using edtech to personalize learning. When you think about what you want your classroom to be like next year, what one new thing are you going to focus on this summer? Can I make some suggestions?

Master Teacher and Student Workflow in the Classroom

If you haven’t yet embraced it, make learning how to use Google Classroom your #onenewthing. Google Classroom provides you with the ability to create a well-defined workflow for yourself and your students. Get yourself organized. Get your students organized. Make it the one-stop-shop for your students. Use it as a place where students can create, collaborate and share. One of my favorite ways to use Google Classroom is as a way to give timely feedback to students. A great resource to help you get started is 50 Things You Can Do with Google Classroom by Alice Keeler and Libbi Miller.Image result for 50 things you can do with google classroom

If you aren’t the book-buying type, check out the Google Classroom section of www.alickeeler.com or the Google Classroom section of the Shake Up Learning website.

Increase Student Engagement and Amplify Student Voice

Have you been acting as the “sage on the stage” in your classroom? Does all information run through you and you direct access to content while controlling the pace with which students interact with said content and show mastery? Do your students all show mastery in the exact same way and either turn in identical answers on assessments or projects that are almost identical to each other? If you are ready to start giving students ownership of their learning and a choice in how they show what they know, then make your #onenewthing all about student empowerment and student agency through voice and choice in the classroom.

Sure, you can use Google Classroom to pass out and collect assignments and you can use other Google tools to provide lecture notes and guided learning opportunities, but if you become more innovative and embrace learning in a digitally rich environment, Google Classroom and other GSuite for Edu apps can have a profound impact on student learning. Instead of just having your students write a paper, why not give them a choice of tools to use to either create an infographic, a video, a presentation or any other way they might decide best allows them to show their learning? Perhaps your students will combine Google Draw and Screencastify to explain their mathematical thinking and create a visual of the problem they are solving. Or maybe your students will use Google tools to collaborate with other students in the next classroom, the next city or the next state.

To get started with this #onenewthing, check out one of these three awesome books (click on each cover for more information):

Image result for google infused classroom

Image result for 50 things to go further with google classroom

Image result for google apps for littles


Package Lessons to Allow for Choice, Pace, and Place

Are you ready to take that increased student engagement and amplified student voice and kick it up a notch? Are you ready to be a “guide on the side” and give students the ability to learn at their own pace and perhaps even in their own place? If so, then make HyperDocs your #onenewthing. HyperDocs are lesson designing for the 21st-century classroom because it removes the teacher from the front of the room and creates opportunities for the students to engage with content in a way that forces them to move from consumption to creation. The tenants of a HyperDoc require a student to engage, explore, explain, apply, share and reflect on their learning. Since the lesson is packaged in a digital format (which means that you can give students a choice in how they access content), it allows the teacher to remove themselves from the front of the room and assist students on an individual basis as they work through the HyperDoc. And since students are not bound by a traditional lecture session, they are able to work at their own pace, often in their own place, seeking out assistance as needed. To learn more about HyperDocs, check out the official website, https://hyperdocs.co/ or explore the HyperDocs Facebook group to interact with other teachers on this HyperDoc journey. There is also an awesome book that will walk you through the philosophy and creation of Hyperdocs.

The HyperDoc Handbook: Digital Lesson Design Using Google Apps by [Highfill, Lisa, Hilton, Kelly, Landis, Sarah]

Gives Students a Platform to Share and Celebrate Their Awesomeness

We live in a Youtube world where people have become millionaires by sharing videos of the most mundane aspects of their lives.  I cannot even count the number of times I have seen my kids watching videos of other kids play video games, playing with slime, unwrapping boxes or sharing their thoughts and beliefs about any random topic that pops into their minds. Our students want to be heard. They want to leave a footprint and they want to see what their peers are up to. Not only do kids want to see each other, but their parents want to be able to see what they are doing as well. That is why learning how to use social platforms like Flipgrid or Seesaw might be a great #onenewthing.

Image result for flipgrid iconFlipgrid bills itself as a place for students to go to share ideas and learn together. Give your students a prompt. Give your students a place to share. Allow them to be creative and express themselves as individuals. Spark discussion and find opportunities to share with other Flipgrid classes from around the globe! Or, keep your discussions personal and give students a chance to speak directly to you without other distractions. Check it out and I promise you won’t be disappointed.

Image result for seesaw icon Seesaw is is a student-driven digital portfolio that empowers students to independently document what they are learning at school. The family of each student has the opportunity to connect with the Seesaw classroom to see videos, pictures, and the awesome work of their very own child.

What Should Your One New Thing Be?

I know that trying new things in the classroom can be daunting and intimidating, but never forget that your students are trying something new every single day at school. Spending the summer as a learner is an amazing way to connect with your students. If you try out any one of these new things, or any new thing for that matter,  you are modeling risk-taking and growth mindset for your students. Be a learner! Be a risk taker! Try out just #onenewthing this summer that will help turn your fall classroom into a place where learners feel engaged and empowered.


Posted in Cool Tools, Google Workspace for Education, Student Creation

Combine Google MyMaps and Screencastify For Awesomeness!

Recently, I had a high school French language teacher approach me to ask for help designing an activity where students research Parisian monuments and locations of interest, report pertinent information and show pictures and location of the monuments. And of course, since this is a French class, they would need to use their French language skills as they report on all of these interesting sites.

I immediately knew what tools to share with her; Google MyMaps and Screencastify. MyMaps allows for students to collaborate on the same map, write interesting information right on the map, and add images to their points of interest. Once the students create the written and visual portion of the assignment, they can use Screencastify to record a personal tour guide narrative as they click through their points of interest.

The steps to set-up the project were relatively easy since students will be doing most of the creation. Michelle, the French teacher, created a MyMap with the satellite view that plunked the user right in the center of Paris. She copied the map four times to share with each of her classes, made the maps editable by anyone with the link and then grabbed the share link to put into an assignment in Google Classroom. Expectations for students are that they are to pick three or four points of interest in Paris to research and provide basic visitor information that would entice tourists to come to take a look.

satellite map showing the center of Paris with guides and layers on the left.
Blank MyMap of Paris – students start here

Since multiple students are sharing the same MyMap, they can create their own layer to house their points of interest. The layer building process is very easy:

  • Click on the layer name (should currently be called Untitled Layer). Students type in their names. Once someone grabs the first layer, they will need to add a new layer by clicking the “Add Layer” button and then add their name to
  • Students type their place of interest or monument into the search bar at the top of MyMaps
  • Once the location has been identified, they can either click the “+” button on the details dialog box or click the “Add a Marker” icon next to the hand icon on the map.
  • Now they can add details by typing in the text box and add images by clicking on the camera icon. Images can be added from a Google search or pulled from a student’s Google Drive. Multiple images can be added to any point of interest on a MyMap.
  • They can then use the bucket tool and select a color for all of their pins. This allows them to quickly differentiate their pins from those of other students.

This slideshow requires JavaScript.

Now comes the fun part! Once the students have created their 3-4 point of interest, they will act as a tour guide and share their findings by narrating (in French, of course) as they click through their map points and images. They will use Screencastify to record their work since it so easy to use and stores right in Google Drive.

The final part of the activity will have the students posting their Screencastify videos into a collaborative Google Slides presentation. Instead of having to sit and listen to presentation after presentation like they have done in the past, students will select five or six videos created by their peers, watch them and then talk about which Parisian sites they would like to visit based on what they saw in the videos.

I love this project! It allows students to choose the sites that interest them the most, gives them opportunities to create in a digital environment while they practice their language skills, and allows for peer-to-peer feedback on the final project. I can see this type of activity being used in so many different subject areas and classes. Why don’t you give it a try?

Posted in Cool Tools, Google Workspace for Education, Student Creation

Students as Creators in a Digital Space

Learning is more than listening and writing down correct answers on a worksheet or test. Learning is when students take concepts in, turn them this way and that, look at them from all angles and remix them with concepts already discovered, and then create something new as they construct new knowledge for themselves. Students need to be more than consumers, they need to be creators. They also need the opportunity to share their creations with a larger audience which allows their creations to be more meaningful and authentic. If you want to give your students some opportunities to create in a digital space with Chromebooks as their platform, try out one of these awesome edtech tools.

Google-Drawing Google Drawings: An often overlooked and definitely underused program in G Suite is Google Drawings. Drawings gives the user a blank canvas that, just like every other application in the Google product line, allows for creativity and collaboration. At its most basic, Drawings acts as a desktop publisher. Start with a blank canvas, add text and images, then download or share. Drawings can be downloaded as a PDF, png, or jpg. Drawings can also be published directly to the web! As a creation tool, the possibilities are endless, but here are a few suggestions:

  • Students create diagrams during lab work
  • Students create an infographic to showcase understanding of a concept
  • Students create a Drawing that explains their process and thinking about a math problem
  • Students use Drawings and Google Maps to teach about historical or geographical concepts
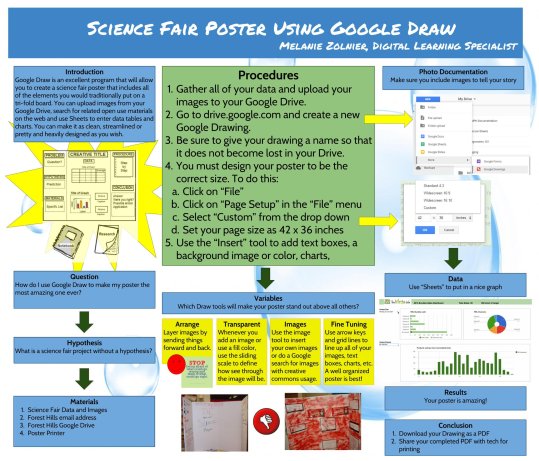
  • Students create a poster for projects like the science fair – look at my amazingly awesome example!

    science fair poster

bookcreatoriconBook Creator for Chrome: Book Creator bills itself as “the simplest way to create and share ebooks in your classroom.” The program runs as a Chrome app and students (or teachers) can combine text, images, audio, and video to create a media-rich book that is hosted online and can be shared with other students, teachers, parents, and communities. The creation tools are very easy to use and making high-quality pages is a cinch even for the youngest user. The camera and microphone features allow the creator to add personal images and narration of their text.  Creators are able to link to their Google Drives and pull content directly into their ebook, which allows for app smashing where students create content with other tools and then bring the content in from where it is stored in Google Drive. There is also a feature that allows for a Google image search (the best part is that the search will only bring back images labeled for reuse). When it is time to share, the book can be published online, downloaded as an epub, or printed.

Of course, a natural use of Book Creator would be to write and publish stories and poetry books. However, it can be used by your students to create a wide variety of products like nonfiction text, research journals, or how-to manuals. If you want to see how other teachers have used Book Creator, check out this Pinterest Board or look at the book below.

powtoon

Powtoon: Powtoon is an animated story builder that allows students to create engaging explainer videos on a wide range of topics. By using storyboards or templates along with items and sounds from an extensive library, students can create a professional looking video that will wow even the most critical teacher. Concept explanation and idea sharing take a brand new path while students learn design elements and video editing techniques. Instead of having every student get up in front of the classroom and read from their notes, have them create a Powtoon, post the link to it in a shared space like Padlet or Google Slides and then have students interact with the videos. You could even have the creator of the video create an exit ticket that students need to complete after they have watched the video selections.

Here are a few examples of concept videos created by students:

There are a multitude of creation options out there on the interwebs. These three just happen to be some of my personal favorites. Introduce these to your students or allow them to go and search out one of their own. The point is to get them creating. Let them show you what they know in new and innovative ways instead of ending every unit with a paper and pencil test or a worksheet.