Does your Google Drive or your GMAIL feel like a giant black hole where you can never find what you are looking for? Have you ever wondered how to make the most of your internet searches? Check out this week’s Tech Tuesday which is all about how to be a Savvy Searcher in your Drive, GMAIL, and online. Learn tips and tricks that will have you digging for gold, er, your materials, and actually finding them!
Are you a to-do list maker? Do you scribble down all of the things you need to do on whatever random piece of paper you find on your desk? Are you always searching for just the right way to keep track of your tasks? Have you ever had an “oh, &*@$!” moment because you forgot to do something that really needed to be done? Or, are you looking for a way to get your students to embrace organizational techniques that will help them get their work done?
If any of these describe you, then do I have the solution you have been looking for! Google recently updated their TASK feature (embedded in Google Calendar) and made it an amazingly easy tool to use. It is now more robust, accessible in multiple ways, convenient and can help you make sure that you are in control of your tasks. In fact, it will make you the MASTER OF TASKS!
To learn how to be a master of tasks, check out this tutorial I created for the teachers in my district. Once you have mastered your tasks, make sure you teach your students to do the same!
I am super hyped about the new feature in Google Docs that allows you to create and save your own templates that can then easily be accessed by typing the @ sign followed by the name of your template. I think this new tool will really streamline a lot of my work and the work of other teachers.
Here is a video I created that will give you a quick overview of what building blocks are and how I think you can use them.
There are so many ways I can envision using building blocks:
Any activity or report that you recreate every week by making a copy of the doc you used last time and use by deleting the content you added the last time you used it.
Student reading logs – Use a table. In one column, create a dropdown of genres. In another column, have a dropdown for the number of minutes read. In another column, create a dropdown of emoji reactions for the book.
Group project assignments – Create a template for group projects using the product roadmap as the basis. There is a column on there for status and a spot for related files. Make the template and use smart chips to attach materials students will need to access for the project. Create an assignment in Google Classroom where you assign one page per small group with the “everyone can access” option. Students in the group will then work on the same document and you can track their progress with the progress dropdown. They will submit just one paper for you when they are done with the assignment.
Lab work – Similar to above, create a template for lab partners. You can use the product roadmap as a basis and insert directions, material, and spreadsheets for students to be able to record their data.
Newspaper, magazine or encyclopedia articles – Create a template that you want students to use that mimics any of those types of writing. Leave places for images, create columns, titles and leave spaces for headings. Assign in Google Classroom.
Lesson Plans – Create plans with columns and dropdown menus that have standards or units in them. If you are working with other teachers to create these templates, you can use smart chips to assign responsibilities for each section.
This is just the tip of the iceberg! I am sure you have a lot of ideas on how you could use Building Blocks in Docs, but you probably need to know how to get started with building blocks in the first place. You can use my start up and resource guide to get yourself going.
What will you use Building Blocks for? Leave your ideas in the comments.
If you are looking for additional resources or tutorials on everything Google, feel free to check out the PD website I created for my teachers so that they can get just in time training on all things edtech.
Many of the teachers in my district have not been shutting down their computers at night because they don’t want to have to reopen all of the tabs they use every day. Tabs like their morning message slide, email, and our student information system used for attendance. Not shutting down a computer every night is a breach of security. With your computer open and logged in, any person who comes into your room has access to information that should be secured. Not shutting down a computer every night also keeps it from catching the updates that will help it run smoothly. To help teachers feel comfortable shutting down each night, I created this video for them showing that they can create a bookmark folder of all of the materials they need to open each day. Once they create this folder, they can simply right click on it to open all of their teaching materials with one click of a button. I hope this helps you as well!
In the past, I have always recommended that you make a copy of your Google Classroom so that you have a clean copy to use with your students for next year. However, what I have begun to see for those of you that have very material and video heavy Google Classrooms is that the new copy you have created is missing materials or seems to get caught in a loop where your videos never process correctly or attachments are gone. I have done some research on this issue and can’t find a really good solution within Google, so I am suggesting that you take the following steps and create what is considered a “Master Classroom.” This master classroom will contain all of your content, in descending (whatever you assigned last will be at the top) order, but will be a repository that you can use to assign (by using the “reuse assignment” option) into a new Classroom. That way, all of your original content is still there, you can see what order you assigned it, but you don’t have that terrible moment where you and your students discover that the content you thought was in your Classroom really isn’t there.
To create your new “Master Classroom”:
Return all student work
Remove students from the Google Classroom
Rename your Classroom to “Master Classroom” or whatever other moniker helps you remember what you are going to use it for.
At the beginning of the next school year, create a “NEW” classroom and use the “Reuse assignment” option to pull the content from your “master classroom” into the new classroom. This way, it will create an assignment or material that you can give a current due date to your students.
Your new master class is going to work as that old fashioned plan book that we used to write every single lesson into! You can now scroll through topics and assignments that you have used in the past and reuse them in your new Google Classroom. The benefit of this is that in your master classroom, all of the assignments, materials and topics are already published because you used them in the past. When you reuse them in your new Classroom, it puts them back into draft form, allows you to edit or add new materials, and assign new due dates to your new students. To reuse a post:
Open your new Google Classroom
Click on Classwork
Click + Create
Click Reuse post
Select your master class from the list
Find the assignment of material, click on it and click “Reuse” in the bottom right
DO NOT SELECT “Create new copies of all attachments” because it will make a mess in your Drive
Your assignment or material is now in draft mode. You can add new directions and materials or remove old content you do not wish to use. You can give a new due date or schedule the assignment. You can add plagiarism checking, assign to individual students, or just leave the assignment/material in draft mode for when you are ready to to use it.
To see how to use the reuse option, watch this short video (no sound).
As you are wrapping up the school year, there are a few housekeeping items that you should attend to when it comes to your Google Classroom.
The best procedure to close out your year is to: 1. Return all student work 2. Make a copy of your Classroom if you would like to reuse it next year 3. Archive your current Classroom
If your Google Classroom is not content heavy and you want to be able to use it again next year with your students, you should make a copy of the Classroom so that all materials go back into draft form so your new students will not be confused by materials that you used with previous students. Simply deleting this year’s students from a Google Classroom and reusing it with new students actually creates more work for you in the long run since all materials are already published, are assigned with due dates, and have student work associated with them. When you create a new copy of your current Google Classroom, you are setting up a clean environment that still has your materials, just in draft form that can be published when you are ready. When you archive your old Google Classroom, your previous students will still find all of their assignments and materials in their Google Drives and will still see an archived version of the course if they dig deep into the Classroom menu, but the Classroom will be view only and students will not be able to change or edit anything in the Classroom itself.
When you make a copy of your Google Classroom, all content on the Classwork section of Classroom is automatically put into draft mode. You will then be able to go in and publish each item as you are ready to use it. Even better is that before you publish it for students, you can edit the assignment or material to update it for the current year. It really is a win-win situation. The only problem with making a copy of a current Class is that only the content on the Classwork page is copied. Materials on the Stream will not copy.
Follow the steps below to wrap up your Google Classroom for the year.
Return all work: You want to return all student work so that Google moves it from your drive to their drive. Otherwise, you will be wading through student work in your Drive until the end of time. The fastest way to return student work is to:
Open a specific Classroom
Click on the Grades link from the menu on top
Click on the three dots to the right of each assignment name
Select “Return All”
Click “Return”
Move to the next assignment and repeat
Make a copy: If you want to reuse the same class for next year (see above to understand why it is better to start with a fresh class rather than delete students from the current class) or you want a copy of your class for reference:
Go to classroom.google.com
Click on the three dots on the right of the Class tile that you want to copy
Select “Copy”
If your Class has a lot of content, it can take some time to make a copy. You will receive an email from Classroom once your copy has been made.
Archive the Class: Clean up your Classroom view by archiving your Class. Don’t worry! You still have access to the archived class and can pull content directly from that class into a new class with just a few clicks of a button. To reuse archived content,
Go to classroom.gooogle.com
Click on the three dots on the right of tile of the class to be archived
Select “Archive”
Don’t forget that you can always reuse materials from archived Classrooms. Just because they aren’t viewable on your current dashboard doesn’t mean that they are gone forever!
If you have a content heavy Google Classroom, you might discover that making a copy leaves you with missing content and videos. If that is the case, try my suggestion for making a “Master Google Classroom” from this post.
I have been getting a lot of questions from teachers about issues they are having with Google Classroom and Screencastify while trying to teach remotely.
The first, and probably most pressing issue teachers seem to be having is that when they create their Screencastify videos, their words don’t match their mouths. Nobody has time to look like they are a star in a poorly dubbed film! The fix for this is hard, arduous, and absolutely necessary. Are you ready for it?
RESTART YOUR DEVICE!!!!
Seriously, when is the last time you actually did something other than close the lid on your Chromebook or laptop? If you can’t even remember when, then you must shut down and restart right now (or after you finish reading this). Your device is managing a billion processes that you started and just left running. Doing a hard shut down and restart will help immensely.
The other way to fix this issue is to close the gabillion tabs you have open before you start recording. If your device is trying to manage a gabillion things at one time, your video is not going to get priority attention.
The second issue people are having is that they will create Google Classroom assignments with the “make a copy for each student” option, but the attachments don’t appear for all students. This is a known glitch in Classroom. Alice Keeler wrote a blog post about it. She says that eventually, the attachment will appear for the students. I have also heard that if you send the student a private message on that particular assignment, it will force the attachment to appear. What seems to work best is if students follow these steps:
1) Click the classwork tab at the top
2) Click on the assignment title to expand the assignment
3) Click on “View Assignment”
4) Locate “Your Work” in the top right corner and click on the file with your name on it.
Just remember, you are awesome and amazing and you are doing your best for your students as you try to learn this whole new way of teaching! Don’t be too hard on yourself. You’ve got this!
Google Classroom has released a new feature called “Originality Reports.” This feature is designed to help your students avoid ‘accidental plagiarism” from all that copying and pasting from the internet that they do.
Here is the official description of the feature from Google: Originality reports is a new feature that brings the capabilities of Google search right to your student assignments and grading interface through Google Classroom. The learning tool helps both teachers and students thoroughly review and analyze coursework to make sure it is properly cited and avoid unintentional plagiarism. This feature was designed to help students improve their writing and spot potential issues while saving you time while grading.
You and your students can check work for unoriginal content with Originality reports. This tool uses Google Search to compare a student’s Google Docs against billions of webpages and millions of books. Originality reports then displays links to the detected webpages and flags uncited text. The reports can:
Help students identify unintentional plagiarism and uncited content before submitting assignments.
Help teachers see where students used source material and if they properly documented their sources.
When you turn on Originality reports for an assignment, students can run 3 reports per assignment before submitting their work. You can’t see the reports students run. After students run their last report, they can continue to improve their work before submitting the assignment.
This feature is actually pretty slick and easy to use. When you create an assignment in Classroom, you have the option of turning on the originality reports by simply clicking the button on the right of the assignment dialog.
Originality reports are still in beta but if you see this button, you are ready to go!
Once you have built your assignment and clicked that button, the students will interact with the assignment the way they usually do. They can create content right in Classroom or they can add an already created document to the assignment. When their content is attached to the assignment, they then have the ability to run an originality report on their work up to 3 times before they turn itin.
The idea behind this feature is to teach the students how to write and cite and create original content. When the students run the originality report, Classroom basically runs a Google search and brings back any content matches that are found on the web. Students can then address these findings and rewrite for originality or create better citations for the content they have included.
Here I have a student writing a paper about the industrial revolution. In true lazy student fashion, I simply created a Doc in the assignment, did a quick web search and copies content to my doc.
Online content my student copied and pasted.
It was easy to just create a Doc and paste in whatever content I found online!
Once I was done copying and pasting the content, I looked back at the assignment view in Classroom and clicked the “Run” button on the far right of the student assignment view. Classroom ran the originality report and then provided me with a link I could click on to see what was found. My teacher cannot yet see this report; it is private only to me at this point.
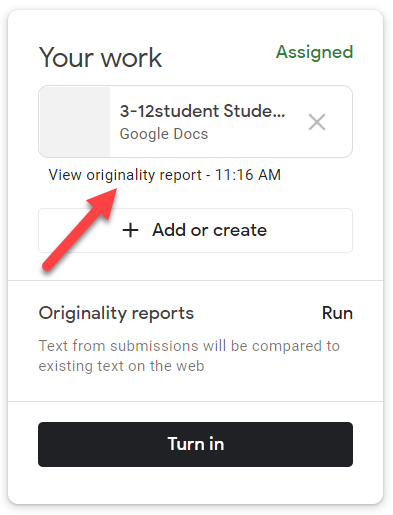
Students simply click on the link to view the report.
As you can see by the giant yellow highlight, Google caught that I had copied and pasted the entire text from a web source. Not only did it flag that all of my content was copied and pasted, it also gave me (as a student) the top web match for where I got the content. If I (as a student) can see that match, you better believe that my teacher can as well if I submit this document as is!
Guess I am a big, fat cheater!
Because I understand the mind of a teenager better than I would ever want to, I then decided to “edit” this paper a little by taking out some key words, changing a few sentences around while trying to “make it my own.” After I made these changes, I then ran the second of three available originality reports. But, alas, Google once again caught my lazy work habits. But, since I am a teen, I went ahead and submitted this assignment anyway! I am sure my teacher won’t notice.
When I change roles and look at student work, you will see that, as the teacher, I do not have to do anything to run my own originality report. Classroom automatically runs an originality report for each submitted Docs file, visible only to you. If a student unsubmits and resubmits an assignment, Classroom runs another originality report for the instructor. These reports don’t appear on this view. You need to open the student work to be able to view the originality report.
When I click on that blue link, I can see the full originality report and identified web sources.
When I open each individual assignment, I can see that content has been flagged.
I can now have meaningful conversations with this student about their work and this also lets me know that I have more work to do when it comes to teaching proper research techniques.
Originality reports are viewable for 45 days. After that, you can run another report by opening the student’s submission from within the Classroom grading tool.
When you share this tool with students for the first time, Google suggests that you preview it or share this post in Classroom before you begin.
This feature is not going to automatically check all student assignments. You simply need to enable it when you need it. Originality reports are still in beta, so check and see if your district administrator has asked to pilot this feature in your district.
I can’t believe that I am saying this, but stop letting your students share.
Just say no to the sharing of Google Docs, and Slides, and Sheets, and whatever else they think they want to share with you!
It is time to get rid of those endless emails alerting you that your students have shared something with you to review or grade. Let the natural workflow of Google Classroom work for you!
When you create an assignment in Google Classroom, students can attach virtually anything to that assignment as long as it is in their Drive or available as a web link. They also have the option to create a Doc, Slide, Sheet or Drawing. Once they have attached content to an assignment, you can immediately interact with their content. If the students are turning in something like a Doc, Slide, Sheet or image, all of those are easily located because they are all in one place! You can find them right in the Classroom assignment or you can find them in the Classroom folder with the assignment name in your Drive.
Student view of an assignment in Google Classroom
Look at all those options!
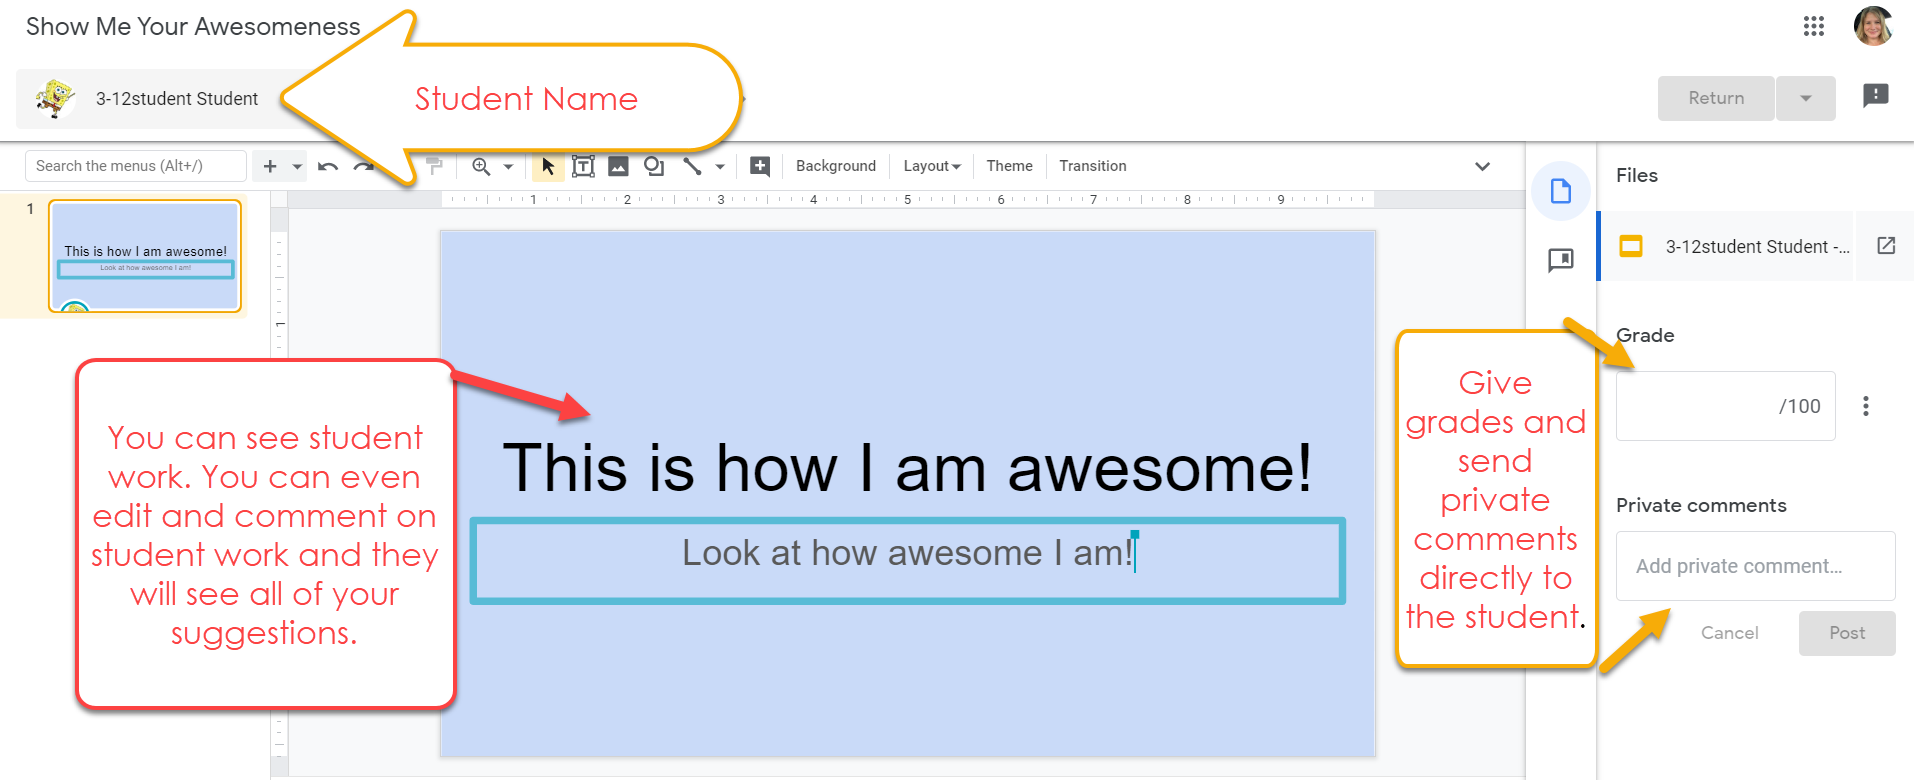
Once they have attached something or created something, you are able to view it, make comments on it, and even grade it. If the students are turning in something like a Doc, Slide, Sheet or image, all of those are easily located because they are all located in the same place. You can find them right in the Classroom assignment or in the Classroom folder with the assignment name in your Drive.
At a glance, you can see if a student has work attached to the assignment.
You can interact directly with the student work; edit, leave comments and even grade.
Your one stop shop for interacting with student work.
This assignment can be found in my Google Drive – It is in the Classroom folder.
This is in comparison to the hot mess you get when students share their work with you via email or with the share button. Of course, that work will show up on the shared side of your Drive, but how will you track what you have gotten, and from whom? Just put the assignment in Classroom and let it do it’s magic.
Workflow in Classroom:
Teacher – Create assignment. You do not have to attach anything to the assignment. Just make sure that in the instructions section, you tell students that they should add or create their content right there. There is a button. People love to push buttons!
Students – Add or create their work by using this button inside the assignment.This button gives them the option to go right into their Drive and pull something that is already housed there or they can create right on the fly. Students also have the option to add files that are not Google files like images, PDF documents and web links. The possibilities are endless!
Teacher – Interact with the student content right in Classroom. No need to go digging through email or looking at the shared side of your drive.
I was working on a project with one of the Title teachers in my district and she was talking about how she often needs to build background knowledge with her students, However, since she sees the kids for such limited time each day, she needed a solution where they could gain this knowledge in an engaging way that was easily managed but not completely teacher directed.
Mrs. D. wanted her students to watch short videos about the topics they were going to cover in class, but she was worried that the students wouldn’t really attend to the videos and would quickly forget whatever information was presented. She felt that having the students answer a few short questions after watching the video would help them engage with the content. And, if the students could rewatch the video as they figured out the answers to the questions, it would take the stress of having to memorize the correct answer out of the mix. By doing a little app-smashing, I think we came up with the perfect solution!
We searched YouTube for a short video that gave an easy to understand overview of the topic at hand. For this lesson, she was focusing on dolphins. Once we found the video we grabbed the share URL from Youtube and then added it to our blank Google Form using the insert video option.
We also created a few short questions that her students could answer after viewing the video. Because these students struggle with reading, we made sure that the questions were easy to read and followed the flow of the video. Forms not only allows you to add video, but you can also add images. So for one of the questions, we made sure that the students had images to work with as well as words. Adding images is relatively easy since you have so many different options for images in Forms:
I often like to have my images already saved in my Google Drive.
We spent a little time making the Form pretty, but within 5-10 minutes, we were ready to go!
We now had to decide the best way to share this content with the students. Since this teacher is already an avid Seesaw user, we decided that sharing it as a journal item would be the easiest way for the students to interact with the content. To do this, we needed to grab the “send” link from the Form. She didn’t necessarily want to force the students to have to login to Google if they were viewing this activity at home, so we had to make sure that we changed the Form settings to allow responses from users outside of our district domain.
Once we had the link, all we need to do was to post it in Seesaw to the student journal. When you go to add the link, Seesaw will ask if you meant to add it as a file from your Google Drive. You DO NOT want to add it as a file! Simply paste in the link and click the “Continue” option. After you complete this step, you will have the opportunity to share the Form with your entire Seesaw class, or you can individually assign to specific students.
Don’t be alarmed by the ugly “this format” blah, blah, blah! As soon as your students click on the link, it will bounce them directly to your Form where they can watch the video and interact with the content.
Ignore this warning. It is just full of empty threats.
Your students will now be able to watch the video and respond to your questions by accessing it through Seesaw. Students get some background knowledge, they can watch the video as many times as they need to understand the content, the teacher is freed up to work with another student while the video is being watched, and everybody wins!
This can be used for a variety of purposes beyond just building background knowledge. Video is a powerful tool! You could do something similar for:
Math Review
New skill introduction
Making connections with historical content or literature
Lab directions/experiments
You aren’t limited to Seesaw. Your delivery method could be Google Classroom, Padlet, Nearpod or any other student content management system.
Tell me how you would use this in your own classroom?


 This button gives them the option to go right into their Drive and pull something that is already housed there or they can create right on the fly. Students also have the option to add files that are not Google files like images, PDF documents and web links. The possibilities are endless!