One of the ways we have been able to support students with little effort on our part is by teaching them how to use Immersive Reader, an app that students could use to have online content read to them. It had some kinks to it, especially with how it didn’t work well with Google stuff, but it was our only option.
However, it no longer works with Google Chrome and so we have had to pivot. And this pivot has actually turned out to be wonderful and much more useful for students.
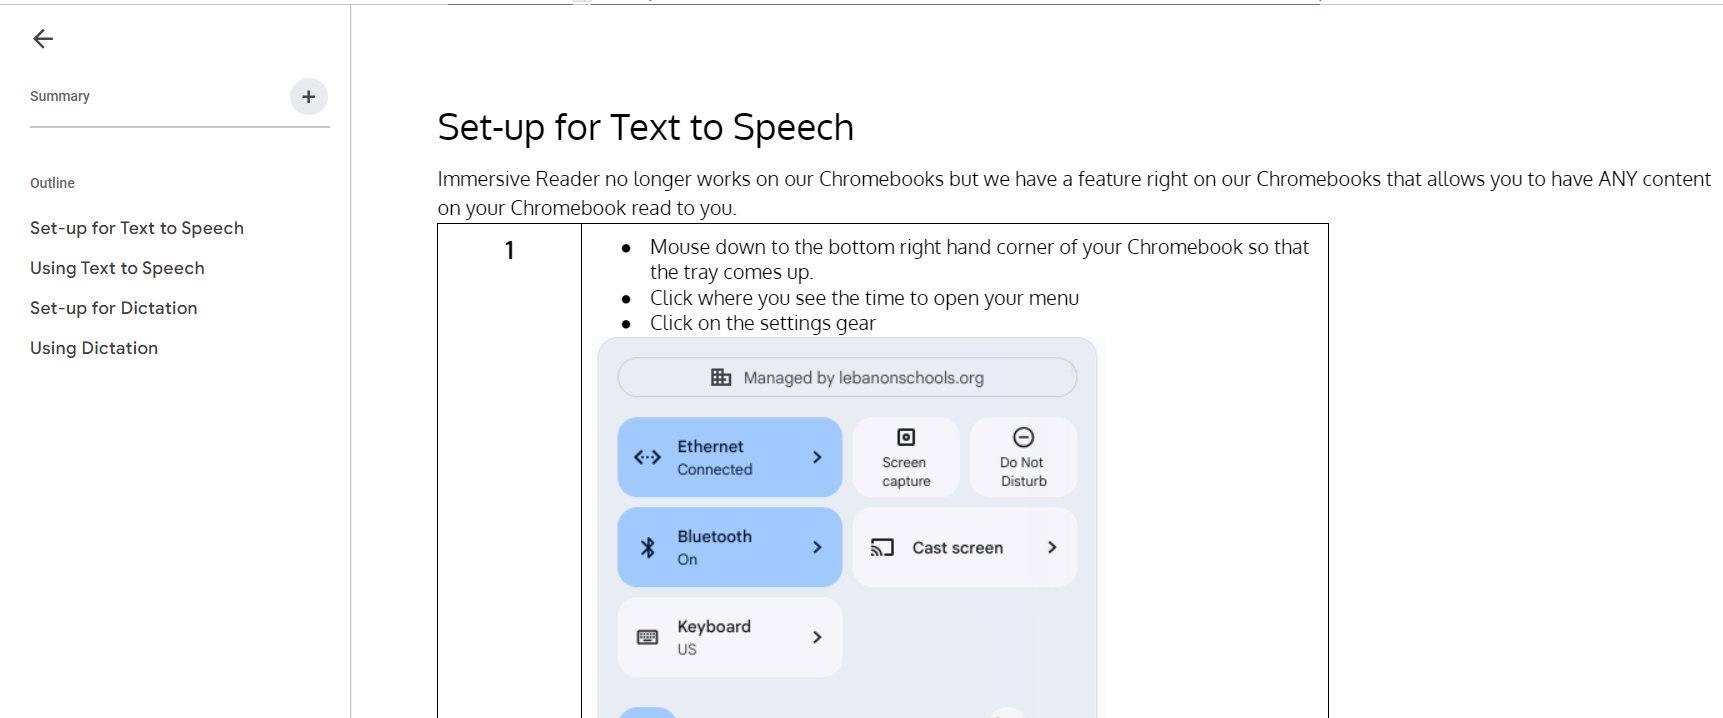
On their Chromebooks, students have accessibility tools that open up learning opportunities for all students regardless of their reading or writing abilities. Their Chromebook has a speech to text feature that will read ANYTHING on their screen to them. They also have access to a dictation tool that will allow them to voice type anywhere there is a text field, even on Google Slides and Google Forms!
Chromebook Accessibility Tools in Action
These tools are crucial for the success of some of our students so I am counting on you to get the word out. I have created materials for you to share with the students. These materials are set so that you can place them in Google Classroom or show them to your students in class. This is especially important for our junior high and high school students that are desperately trying to hide their need for accommodations.
Show students how to set up and use the Text to Speech Feature
Show students how to set up and use the dictation tool
Step-by-step Written Guide with Visuals for both Features (Expand the document outline on the left to access the table of contents)
Are you a to-do list maker? Do you scribble down all of the things you need to do on whatever random piece of paper you find on your desk? Are you always searching for just the right way to keep track of your tasks? Have you ever had an “oh, &*@$!” moment because you forgot to do something that really needed to be done? Or, are you looking for a way to get your students to embrace organizational techniques that will help them get their work done?
If any of these describe you, then do I have the solution you have been looking for! Google recently updated their TASK feature (embedded in Google Calendar) and made it an amazingly easy tool to use. It is now more robust, accessible in multiple ways, convenient and can help you make sure that you are in control of your tasks. In fact, it will make you the MASTER OF TASKS!
To learn how to be a master of tasks, check out this tutorial I created for the teachers in my district. Once you have mastered your tasks, make sure you teach your students to do the same!
While this feature is still in beta mode, you can now add interactive questions to YouTube videos that are attached to Classroom assignments. Watch my video to learn more about this great new feature.
I am super hyped about the new feature in Google Docs that allows you to create and save your own templates that can then easily be accessed by typing the @ sign followed by the name of your template. I think this new tool will really streamline a lot of my work and the work of other teachers.
Here is a video I created that will give you a quick overview of what building blocks are and how I think you can use them.
There are so many ways I can envision using building blocks:
Any activity or report that you recreate every week by making a copy of the doc you used last time and use by deleting the content you added the last time you used it.
Student reading logs – Use a table. In one column, create a dropdown of genres. In another column, have a dropdown for the number of minutes read. In another column, create a dropdown of emoji reactions for the book.
Group project assignments – Create a template for group projects using the product roadmap as the basis. There is a column on there for status and a spot for related files. Make the template and use smart chips to attach materials students will need to access for the project. Create an assignment in Google Classroom where you assign one page per small group with the “everyone can access” option. Students in the group will then work on the same document and you can track their progress with the progress dropdown. They will submit just one paper for you when they are done with the assignment.
Lab work – Similar to above, create a template for lab partners. You can use the product roadmap as a basis and insert directions, material, and spreadsheets for students to be able to record their data.
Newspaper, magazine or encyclopedia articles – Create a template that you want students to use that mimics any of those types of writing. Leave places for images, create columns, titles and leave spaces for headings. Assign in Google Classroom.
Lesson Plans – Create plans with columns and dropdown menus that have standards or units in them. If you are working with other teachers to create these templates, you can use smart chips to assign responsibilities for each section.
This is just the tip of the iceberg! I am sure you have a lot of ideas on how you could use Building Blocks in Docs, but you probably need to know how to get started with building blocks in the first place. You can use my start up and resource guide to get yourself going.
What will you use Building Blocks for? Leave your ideas in the comments.
If you are looking for additional resources or tutorials on everything Google, feel free to check out the PD website I created for my teachers so that they can get just in time training on all things edtech.
Lesson packaging or content packaging is an important part of teaching these days. Just as you would create a handout, worksheet or physical activity for students, you can create a digital activity that can be shared with students in a digital environment like Google Classroom. When you use the theme builder in Google Slides to build your activity, you can rest in the knowledge that students will be unable to delete any lesson elements accidentally. Some of my favorite edtech creators use the theme builder to create fun activities like the “disguise the turkey” and “decorate a jack-o-lantern” activities. It is also beneficial for those of us using interactive projectors. Isn’t it annoying when you go to click on your model slide and it selects and moves an element without you wanting to? If you are super crafty, you can also create your own slides layouts and designs like those awesome creators on slidesmania.com and slidescarnival.com.
To learn how to use the slide theme builder to create your own slide template, check out my slide tutorial below. (How many more times can I use the word slide in this very short blog post?)
I would love to see the amazing slide templates you create with the theme builder feature. Drop a link in the comments to showcase your work!
There are many times when students create content in Google Classroom as part of a project or assignment and we want them to be able to share their work with their classmates to allow for discussion and interaction. Once the students submit their work to their teacher, it kind of gets locked down and the only person that can view it is the teacher, who then has to figure out ways to grab the content and make it shareable with the class. There are all sorts of work arounds but it usually requires the teacher to put time and effort into copying and pasting student work into a new format or by using a third party app like Flip for students to record and share their work.
The easiest way to have students share their work with their classmates and have opportunities for their fellow students to comment on the work and give feedback is by using the “Question” tool in Google Classroom.
Essentially, you create a question that simply asks students to share their work. To share their work, students create an “anyone with the link can comment” link from their work and post that link as their answer to the question. Once the link has been posted, other students are able to click on that link, view the work of their classmates and then use the comment feature naturally built into Google products to leave feedback for their classmates. Since the question is assigned to students, teachers will be able to see, at a glance, which students have responded from the grading side of the assignment. Easy peasy, lemon squeezy!
Here is how to create this sharing opportunity:
Open Google Classroom, navigate to the Classwork page, click “Create” and select “Question from the dropdown.
Set the question type as short answer and then give your students directions on how they are to share their work. The easiest way is for them to open the work to be shared and create an “anyone with the link – commenter” link that can be copied and pasted in as a response to the questions. Your district might have this option locked to just your school domain, so the student would pick that option along with “commenter.”
Student View When Creating the LinkSample Way to Write the Directions
If you want the students to be able to respond to the work directly on the question thread (this gets a little messy and I don’t necessarily recommend it), make sure you have the “Students can respond to each other” option toggled on.
Allowing students to reply to each other creates a really long thread to wade through.
You can also choose to let students edit their answers. I found that to be helpful when students created and posted the wrong type of link and had to go back and share the right one.
When you create the question, you can always include additional materials. You could create a video showing students what you want them to do. You could share your own work for the students to comment on. You could add a funky music video that harkens back to the golden age of MTV. It is totally up to you!
Students will then be able to answer the question by posting their link as a response. What is kind of cool about this is that they will not be given the option to see the responses of their classmates until they have posted their own response.
Student View in Google Classroom
Once they have posted their link, they will then be given the option to see the responses of their classmates.
After the link is added, they now have the option to see classmates answersThe links show up next to the names of the classmates
Students can now click on the links their classmates shared, open the materials and use the comment feature to leave feedback for their peers.
Students can leave feedback for their peers right on their work.
As the teacher, I can then look at the student answer side of the question to see who has turned their work in and who has not. The links are there for me to click on and I will be able to see who left comments for their peers. It makes it pretty easy to track participation.
Teacher view of the question once it has been posted
Now, I know that you can get all fancy and do this with Flip, but it requires students to go out and use a third party application. The nice thing about using the question feature is that it is all in-house and contained in Google Classroom. And, you can have the students submit just about any product for their peers to view. Videos, docs, drawings, slides, sheets, and images are just a few that come to mind.
I hope this method of student work sharing makes your life a little easier. How do you see yourself using it with your students?
In education, we often work in video. Fortunately, we have been able to step away from the “whole class watches the video at the same time” method of teaching thanks in part to programs like BrainPOP and Edpuzzle. The problem with those programs though are that they don’t live in Google Classroom and are not portable for students to be able to keep their responses or notes for future use after the video assignment has ended.
That is why I am in love with the video preview feature in Google Docs. Using this feature, you can build a multimedia response activity right on a single doc. The students don’t have to have multiple windows open as they can watch the entire video right there while working on their doc.
As an example, I created an activity focused on invasive species. I wanted my students to watch a short video and answer some questions based on the video. I am planning on having them use the answers to those questions in a larger project, so they will need to be able to access them again in the future. Plus, I want them to have access to the original video in case they need to review it as they are working on the larger project.
I created a doc and placed a table in the doc. On the right side of the table, I wrote the questions I wanted the students to answer. I put it on the right side because when the video is previewed, it will cover up the right side and I didn’t want them struggling to move it to type their answers. On the left side of the table, I left space for the students to write their answers. I used a table because I wanted the space to be able to grow as they wrote but still be aligned to the original question. At the top of the table, I linked the video. I used the smart chip feature in Docs to make the link look prettier, but you could just put the link there.
Students can then mouse over the video link and when it pops open, they simply mouse down to the bottom right of the video and click the preview button. The video will then open on top of their doc and they can play it, pause it, rewind it or skip ahead as they work to answer the questions.
Video Preview in Docs
I will assign this activity in Google Classroom with the “make a copy for each student” option. After they turn it in, I can easily return it and students then have access to their notes by either opening the assignment in Google Classroom or by locating it in the Classroom folder in their Google Drives.
This feature makes taking notes so much more accessible for our students! Just an FYI, kids can click the little x in the video to get rid of the commercial bar that covers the video at points. How are you going to use this feature with your students?
Your Google Chrome browser now has a built in QR code generator. If you want to share something as a QR code, you can now do so in two easy clicks! Simply look to the right of your URL and click anywhere in the white space of your URL bar. A QR code icon will show up. Click on it and a QR code will generate. All you need to do is download that QR code and you are set and ready to go!
If you are working on a computer instead of a Chromebook, you will click on the square with the inset arrow icon to access your QR code.
Don’t forget to change your share settings if you planning on creating a QR code for a Google Doc, Slide, Sheet, etc. Nothing worse than getting all of those request for access emails.
I use Screencastify almost every day to make short instructional videos. Sometimes these videos are just a quick point and click moment where I am trying to show someone else how to do something, and often, I don’t even use my microphone because what I am teaching is pretty obvious by what is seen on the screen. I decided that instead of sending a short video to people, that I would just use the cool feature on the Screencastify watch page to turn that short video into a GIF and send that instead. That way, the teacher doesn’t have to click play or rewatch the video because it will just keep playing on a permanent loop.
I then got to thinking about all of the things that I could turn into GIFs. Math problems, science demonstrations, funny reactions, quick guides, and so much more. Because I am in charge of edtech PD for my district, I decided that all of my teachers should know how to make awesome GIFs with Screencastify, and so the following how-to guide was created. Enjoy! I hope you make the most awesome GIFs ever!
A few years ago, I wrote a blog post about how to combine Google Classroom and Screencastify to give students opportunities to practice their oral fluency. We still use Google Classroom for our 3-12 students, but have begun using Seesaw for our PreK-2 students. After working with a kindergarten teacher, I realized that we could also use Seesaw to create activities that would allow for fluency practice. The kinder teacher (Melissa) I was working with wanted her students to practice their letter naming fluency two different times to see if they could get faster and more fluent the second time. She wanted this fluency activity to be on one page with multiple opportunities to record. While this activity was designed for kindergarten students, you could create something similar for older students by adding passages to the canvas in the same way we added the letter charts.
To create this activity, we used a single page activity with directions for students to use the record voice option. We also used the Seesaw Reflect extension to grab content from online. We are very fortunate to live in Ohio where we have access to a statewide resource of teaching and learning materials called INFOhio. My activity is the one on top. I tried to give the students a visual cue on how to access the record voice option by creating the how-to steps with images. Melissa created the one on the bottom and provided a really nice set of directions. Can you tell who the real kindergarten teacher is? If I were to do this with older children, I would take some of the reading passages found in INFOhio and add them to the activity using the Seesaw Reflect tool.
When students add their response to this activity, they open the activity, click on the three dots on the left, click the voice button and record themselves reading. Since Melissa wanted the kids to do a one minute timed trial, they could use the recording counter that begins once you start recording as their timer. When they finish their recording, Seesaw automatically creates a button that says “Listen” and their recording is attached to it. As long as they keep their recordings under five minutes, they can record multiple times. Each time they record another “Listen” button will be created. If they want or if directed by their teacher, they can change the word “Listen” to numbers to show their first, second, and subsequent recordings.
This is how a student will record their fluency.
Once challenge I discovered is that the recording feature often covers the content I want the students to read. I have tried to create the activity so the the material is off to the side a little to keep it from getting covered when they are recording. Another option is to teach the students to double click or double tab on white space on the canvas to get the text box option to pop up. Once it does, they can tap the three dots and choose voice from the menu. It is a little more fine motor work, but it will keep the recording button from covering the content you want the students to read.
If the recording keeps covering the passage, use this method to record instead.
This activity will give your students a lot of independent opportunities to practice their fluency independently. Because the recordings stay right on the Seesaw canvas, students can listen to themselves and hear their growth over time!